About Project Bolony

Project Bolony is about the many things that seem to be happening all around, but only few take notice of. I like to explore natural surroundings, as well as developed surroundings. I used to have chickens, and really like eggs. I also like to make videos of different things. Visit me on YouTube

Devilled Egg Recipe – Very simple method with mustard

There are many different ways to make deviled eggs. This is one of the simpler methods that will be loved by many. This is a staple at any function and is always a welcomed dish.

This page is a summary of the process in making deviled eggs. A more detailed step by step with images and some videos will be forthcoming.

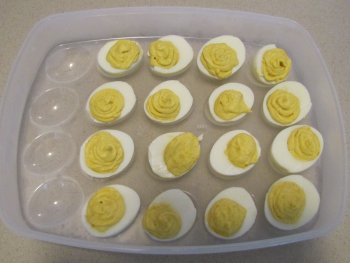
This particular recipe is with 9 eggs in the beginning with 1 casualty. There are 9 yolks in the bowl.

  1. Boil the eggsDeviled Eggs ready to go
  2. Peel the eggs
  3. Rinse the eggs
  4. 1 egg makes 2 deviled eggs
  5. cut eggs in half
  6. separate yolk from egg white
  7. put yolk in a mixing bowl – put egg white in deviled egg tray or flat tray (deviled egg tray is better so they don’t slide around in the car so much).
  8. Mash the yolk in the mixing bowl – mash until all lumps are out – this is not critical as there is more mixing ahead.
  9. Get out the Mayo – yellow mustard – spicy brown mustard (these ingredients can be replaced with other types, such as Miracle Whip and Honey Dijon. These are personal preferences that can be perfected by trial and preferred tastes).
  10. Add 2 heaping tablespoons of Mayonnaise.
  11. Go ahead and mix this up with a spatula until thoroughly mixed.
  12. Add 1 level teaspoon yellow mustard.
  13. Add 1 level teaspoon spicy brown mustard.
  14. Mix well until blended to desired consistency. Don’t be afraid to sample and add more brown spicy mustard if needed.
  15. Clean off egg whites to personal taste. If going to a function, wipe off the yolk from the flat part of the egg whites. The inside round part does not matter. It just makes the lines cleaner.
  16. Put sandwich bag into a cup with the top of the bag folded over the sides of the cup, and put the yolk mixture in it.
  17. close by sealing or twisting the top of the plastic bag, forcing the deviled yolk mixture to the bottom of the bag.
  18. Clip a bottom corner with scissors. Start small and cut bigger if needed.
  19. This will serve as an icing bag and will fill the egg whites without too much mess.
  20. once filled level, designs can be added.
    1. apply swirlies and spirals
    2. fill and over fill to fluff up
    3. use a store bought icing bag and use decorative tips.
  21. Now some different types of personal touches can be applied to the deviled eggs.
    1. sprinkle paprika powder over the finished eggs (sparingly)
    2. or just sprinkle very little paprika powder over only the deviled yolk mixture.
    3. place an olive or a sliced olive onto the top of each one.
  22. Place in the fridge – approximately 1 hour before serving.


That’s it. Please visit some of the other pages to see some of the images and videos of each of these steps.

VIDEO – Deviled Egg Recipe

How to Boil Eggs for Deviled Eggs – Short Version

How to Boil Eggs for Deviled Eggs – Long Version

Setting Up WordPress – Content Management System

Wordpress Login screen


Setting up a WordPress website is really easy and you can be creating content on the web in no time. After navigating to the website you created with Godaddy and logging into the website via the wordpress login screen (on left), it is time to personalize it. The instructions to install a wordpress content management system with Godaddy can be found here – http://www.tagnaples.com/how-to-install-wordpress-on-godaddy/. I have listed 10 things to do when you first login to the site.

  1. go to “Settings” and then choose “General” – Make sure the information here is correct. First your Site Title and Tagline, these are automatically put into themes (or you can choose not to).
  2. Choose Appearance and click “Themes”. Look at the three WordPress themes that are available. If you like one, choose it, or go with the one that is on. If you don’t like them, choose “Add New” and see if you can find one you like. Once you add some themes to your site, you can change the look of the site without having to change any content.
  3. In Appearance go to “Customize”, under Site Title and Tagline you can change it or make it not show up. Then under Static Front Page you can change your Front Page Setting (This is your Home Page or Splash Page)
  4. In Appearance choose “Header” – This is the image at the top of your website (if you want one). Some themes allow you to have several header images to choose from as well as a random image on each page or post.
  5. Now it is time to create a page or edit the existing pages. WordPress is a blog by default, but you may want to create a home page to explain what the blog is about. You may just want to create static pages and not have a blog. WordPress already has one post and one page and one comment. It is a good idea to go in and edit these and that will give you some experience with the process. (deleting the comment so it doesn’t look so much like a new site) You can do this by going to “Posts” then “All Posts”, and “Pages” then “All Pages”.
  6. Creating a Menu will let you name pages and transfer the menu to different themes. You can add pages, posts, categories, and even links as pages. There are widgets that can put menus on different pages around the website. This works good for dropdowns so all the choices can be exposed when dealing with touch screens.
  7. Go back to “Settings” and choose “Permalinks” – Choose the setting that you like, then the page name will happen by default. Most of the time you can edit these settings per page.
  8. “Settings” then “Discussion” – This sets the default permissions for the comments. You can set the comments for each page individually if needed.
  9. Once you get your page up close to the way you want you can go to “Appearance” then “Widgets” and add or remove items from the pages. Different themes will have different widgets so you may have to scroll through and find a theme that is set up the way you want.
  10. Once you find a theme you like or close to it, you can go to “Appearance” then “Theme Options” (if there is one, some don’t have options). Different themes have different options. These can be colors, fonts, post page settings, etc. One theme I found that is fully customizable, even to the tune of having subthemes  is Aspen. If it doesn’t have any options then you can go to  “Appearance” then “Editor” and change files, this changes the actual files in the theme. You may want to consult Google for that.

Now it is time to go and create some content!

How to install WordPress on Godaddy Hosting

wordpress godaddy

This post will explain how to install WordPress on Godaddy Hosting. The best way to install WordPress on Godaddy is to manually download the latest worpress zip file from www.wordpress.org. Then upload the contents of the wordpress file to a file folder on Godaddy. If your installation is not working, make sure your Godaddy hosting plan supports .php. You can always check this before you go through all the steps below. These instructions are for a Deluxe Hosting Account. The Economy Hosting Account may have a welcome.html file to edit instead of pointing in the hosted domains in step 8.

  1. Go to the hosting control center in Godaddy and setup a new MySQL database. You will need the database name, database password, and the hostname later.
  2. Create a folder within the Godaddy file manager. This new folder you create will hold a single installation of wordpress, or a single site. (you can point many domains to a single site within godaddy) Make sure and change the permissions of this new folder to read and write, uncheck inherit (check your folder and click permissions up top, you don’t have to check reset all children to inherit).
  3. Download the latest wordpress zip file from www.wordpress.org to your computer.
  4. Modify the new wordpress file folder so that only the contents are in a zipped file. When you download the original zip file, it will have a wordpress folder in it, then the contents. If you have windows you can just select the contents and then right mouse click and “send to” compressed file. Then move this zip file to a location of your choice (where you can find it when it is time to upload). Upload this zip file to your Godaddy file manager.
  5. With your file manager “unarchive” the newly uploaded zip file to the new folder you created. Your folder should not have another folder inside called wordpress and more folders inside that one. Only the contents of the original wordpress folder (wp-admin(folder), wp-content(folder), wp-includes(folder), and several .php files) should be in your new folder.
  6. In the hosting control center in Godaddy, click IIS Management. This will bring you to the virtual folder setup. Create a folder with the “exact” same name as the new folder you created in step 2. Make sure and check Set Application Root. (This is very important!)
  7. Now you need to go back into the file manager and edit the wp-config-sample file. Either edit with the godaddy editor or download to your computer and edit. There are 4 items to change – ‘database_name_here’, ‘username_here’, ‘password_here’, ‘localhost’ (leave the ‘   ‘). Save and then change the name of the file to wp-config.php and save or upload where the other file was. All this can be done inside of the Godaddy file manager. Check the file, press edit, edit the file, then rename the file.
  8. Go to the Hosted Domains button and make sure the website is pointing to the folder with the wordpress install.
  9. Once your domain is setup, navigate to the site address and the setup prompts should come up and you can set your username and password for the website.Wordpress new site install prompt
  10. Fill out the above screen (which means you did it right) – the Site Title is not the site address – it is what you are calling the site. It will automatically put this name places and it can be changed later. the username is for you to log in to the site, then the password is also for the site. The next screen should be the login screen.Wordpress Login screen
  11. Once you login, you should be at your site now. It is time to edit the site and go on to another topic.

The cat with the Cacaca Call!

This cat has to be calling the bug or trying to communicate with it. This cat is one of the kittens that showed up at our home about a year ago. It is one of three kittens. We still have this one and the mom cat. We noticed the cat doing this thing like he was calling the bug to come closer. He seems to be very preoccupied with the bug in the light. About 1:40 in is where he starts the “Cacacacaca”.

 The Rest of the Story of the Cacaca Cat!

Kittens all huddled up.

One evening my son said he thought he saw a raccoon near our shed. Then the next day this cat shows up with a ringed tail. Then we noticed the kittens on our carport. The mom cat would always be close. Then we kept seeing them in different places, we were thinking the mom cat was moving the kittens to help keep them safe.

Kittens playing in the Garden


Eventually I convinced my wife and daughter that we could not keep them along with our dog, 2 other cats, and 14 chickens. So we went out the next day to round them up and they were not around. After much searching we found them in the bushes, but only 2 kittens and the mom were there. So we took the 3 to the Domestic Animal Services and were able to move forward. They would not take in the mom, but gave her all the shots and spayed her for us. I am not sure if they even charged us, but if they did it was minimal. The other two kittens they kept for adoption.

Kittens playing in the Garden


That afternoon we found the other kitten and kept him safe until we could get him back to the DAS. They were not able to take in a third kitten and would not take the mom bacause she was ferrel. So we now own two more cats. Mally(the mom) and Macho (the male kitten).

Kittens Close up playing with each other


Now they are inside cats, which we keep separated from our other two cats.


Add Facebook Like Button to WordPress Website

Facebook Like Button
The first step in adding a facebook like button to your wordpress website, is you must have an account on facebook.com. If you do not, make sure you Sign up for Facebook first. You can add the button without having to identify the page. Now that you have an account on Facebook we can get started.

Go to https://developers.facebook.com/docs/plugins/like-button/. This is the start. Facebook will let you create the buttons and get all the way finished, but if you try to get the code, Facebook will want you to log in. Keep this in mind. This code is not particular to your account yet, but will be when you press the like button after it is on the website.

Facebook Like Button

The Facebook Like Button Options Screen

This is what you should be looking at. Now it is time to customize your like buttons. Depending on where you want them is depending on how much space you need to render. As you can see on my website, I have them above the content. I also have a google plus button next to it.

  1. If you want to put it site wide, then maybe you want it to “like” whatever page it is on. If this is the case, then remove the text in URL to Like, and leave it blank. If you want to put it on a specific page and make sure that the “like” goes to that page, or maybe just the home page, then put that url here.
  2. The width can be played with a little bit. I have mine set to 250. This way it lets the other button sit next to it, instead of underneath of it. Depending on the “Layout” is depending on this setting. Just leave it blank to get the default width.
  3. The Layout gives you 4 options of how your button will look and what information it will display. As you click on an option, it will update the sample below.
  4. Action Type – to like or recommend. Everyone knows what the like button is for. If it goes right, a popup should allow you to comment and then it will post the link on your timeline. The recommend should do the same thing except say that you “recommend” instead of “like”.
  5. Include Friends Faces – Checking this box should bring up the thumbnails of people who like this page. It will be a much bigger rendering, but may look good on your website.
  6. Include Share Button – Include it. This gives people the option to share your link, which should do better for SEO.
  7. Now it is time to get the code. My settings are below.

Facebook Like Button Options Chosen

The screenshot above is the settings I chose and resembles the Like and Share buttons on my pages.
Once you have decided on your settings. Press the “Get Code” button. You should see a popup like the one below. (Facebook will want you to login to get the code)

The Facebook Like Button Code

Facebook Like Button Plugin Code

This is the code you will need to render the button(s). Copy and paste it into a widget from your WordPress Dashboard. You may have to experiment with the div tags to get it to sit where you want as it relates to other things on the page.

The first section of the Facebook Like Button code is needed only once on the page. I know I have it 2 times on the page and it works fine, so I would expect it to work for you also.

The second set of code is the button itself and exactly where you want it to show up.

Good Luck!

Chicken Waterer – Changing the Bowl on the Homemade Automatic Chicken Waterer

Looking for Automatic Chicken Waterer Parts List?

This is what makes this Chicken Waterer unique. You can remove the bowl, wash it, replace it, or then put it back. It also makes it so that it can be upgraded or changed, if it is not working like it needs to for whatever you are trying to provide water to. Chickens need clean water.

Chicken Waterer Still Kicking


This chicken waterer has been cleaned out a couple of times since it was installed about a year ago. Mostly by just swishing out the dirt. Sometimes the bowl would come off the waterer so that the dirt could be washed out. There is only dirt in here, and it is from the chickens having it on their beaks. It was placed under a shade maker so they would not try to roost on it. It seemed to work, as there has not been any poop in it so far. This has worked out very well as we have not had to “worry” about the water. Of course, we still feed and collect eggs every day, but this has really helped.

Chicken Waterer out of anything

This is an ordinary container. It has a little height to it, and also some width. It just needs enough to hold the depth of water for the toilet fill valve to spread, around 3″ or so. Then it needs to be wide enough for the chickens to get their head in and around the fill pipe.


1 inch paddle bit to drill hole for Chicken Waterer

The 1 inch paddle bit is the perfect size to drill the hole for the cup to change out for the chicken waterer. Using 3/4″ thread, the one inch hole fits it perfectly. The paddle bit will drift, so go slow. The drilling creates heat and starts melting the plastic. Notice there is a board underneath. This helps stabilize the bowl, but it still wants to drift.


Remove the chicken waterer bowl


Unscrew the Chicken Waterer T-handle and remove the existing bowl from the chicken waterer system. Let the system flush and rinse it off as desired. Having the other bowl or cup ready will limit the waste of water. It is good to flush the system out anyway.


Chicken waterer cup is overflowing


As you can see, the top of the water line has changed, due to the different size of the chicken waterer cup. This can be tackled with some adjustments to the toilet fill valve.


Adjust the chicken waterer toilet valve


There is an adjustment screw, or a holding clamp to adjust the depth of the float. If the water is overflowing, you want the float to go down so it will turn off sooner. It may only take a little to get it to turn off where you want it.


The finished chicken waterer bowl


The chicken waterer bowl is installed and is clean as a whistle. Now this bowl can serve as a spare when the other bowl is being cleaned.

Wash the old chicken waterer bowl


Wash out all the dirt from the old bowl.


Use mold and mildew cleaner for chicken waterer bowl


Any mold and mildew cleaner has a little chlorine in it, which will kill the algae. This is a good way to have two chicken waterer bowls that are real easy to change out and clean.


Chicken waterer bowl nice and clean


Now the chicken waterer bowl is nice and clean, ready for the next step.


Nuke the chicken waterer bowl


One more step will assure this chicken waterer bowl is ready to continue service. You can never be too sure. Now there are two chicken waterer bowls to switch out whenever it does get dirty. Anytime the water is in the sun, it is going to get algae in it after a while.

Escape from Poultry Prison – Extreme Chicken Fence

Golden Chicken found a hole in the fence


This golden chicken was getting out almost every day, and we could not figure out why. Then we finally saw her go right through the fence. We had used some fencing that was 5″ or so and the wire was not set in place. So at various locations the holes in the fence could be bigger. We just happened across her going right through. She is the only chicken out of the bunch that was doing this.

Small square plastic Chicken Fence liner


This fence liner works well. It is a very light duty screen, 1″ x 1″ or so. All that is needed is a deterrant. The other fence stands up almost by itself, so now just filling in the holes. This is probably used more for temporary fencing, but works well in this application as a secondary barrier.Construction Fence to secure Chicken Fence


This bright orange construction fence works very well also. The only problem is that it can be seen for a very long distance. Wanting to keep the chicken area discreet for neighbors, passers by, and also animals, may be a challenge using this fence supplement. It works very well though, and is easy to apply. A couple of wire ties here and there and it is installed.


Chicken Fence – installing chicken fence

Chicken Fence – Installing more chicken fence