How to install WordPress on Godaddy Hosting

wordpress godaddy

This post will explain how to install WordPress on Godaddy Hosting. The best way to install WordPress on Godaddy is to manually download the latest worpress zip file from www.wordpress.org. Then upload the contents of the wordpress file to a file folder on Godaddy. If your installation is not working, make sure your Godaddy hosting plan supports .php. You can always check this before you go through all the steps below. These instructions are for a Deluxe Hosting Account. The Economy Hosting Account may have a welcome.html file to edit instead of pointing in the hosted domains in step 8.

  1. Go to the hosting control center in Godaddy and setup a new MySQL database. You will need the database name, database password, and the hostname later.
  2. Create a folder within the Godaddy file manager. This new folder you create will hold a single installation of wordpress, or a single site. (you can point many domains to a single site within godaddy) Make sure and change the permissions of this new folder to read and write, uncheck inherit (check your folder and click permissions up top, you don’t have to check reset all children to inherit).
  3. Download the latest wordpress zip file from www.wordpress.org to your computer.
  4. Modify the new wordpress file folder so that only the contents are in a zipped file. When you download the original zip file, it will have a wordpress folder in it, then the contents. If you have windows you can just select the contents and then right mouse click and “send to” compressed file. Then move this zip file to a location of your choice (where you can find it when it is time to upload). Upload this zip file to your Godaddy file manager.
  5. With your file manager “unarchive” the newly uploaded zip file to the new folder you created. Your folder should not have another folder inside called wordpress and more folders inside that one. Only the contents of the original wordpress folder (wp-admin(folder), wp-content(folder), wp-includes(folder), and several .php files) should be in your new folder.
  6. In the hosting control center in Godaddy, click IIS Management. This will bring you to the virtual folder setup. Create a folder with the “exact” same name as the new folder you created in step 2. Make sure and check Set Application Root. (This is very important!)
  7. Now you need to go back into the file manager and edit the wp-config-sample file. Either edit with the godaddy editor or download to your computer and edit. There are 4 items to change – ‘database_name_here’, ‘username_here’, ‘password_here’, ‘localhost’ (leave the ‘   ‘). Save and then change the name of the file to wp-config.php and save or upload where the other file was. All this can be done inside of the Godaddy file manager. Check the file, press edit, edit the file, then rename the file.
  8. Go to the Hosted Domains button and make sure the website is pointing to the folder with the wordpress install.
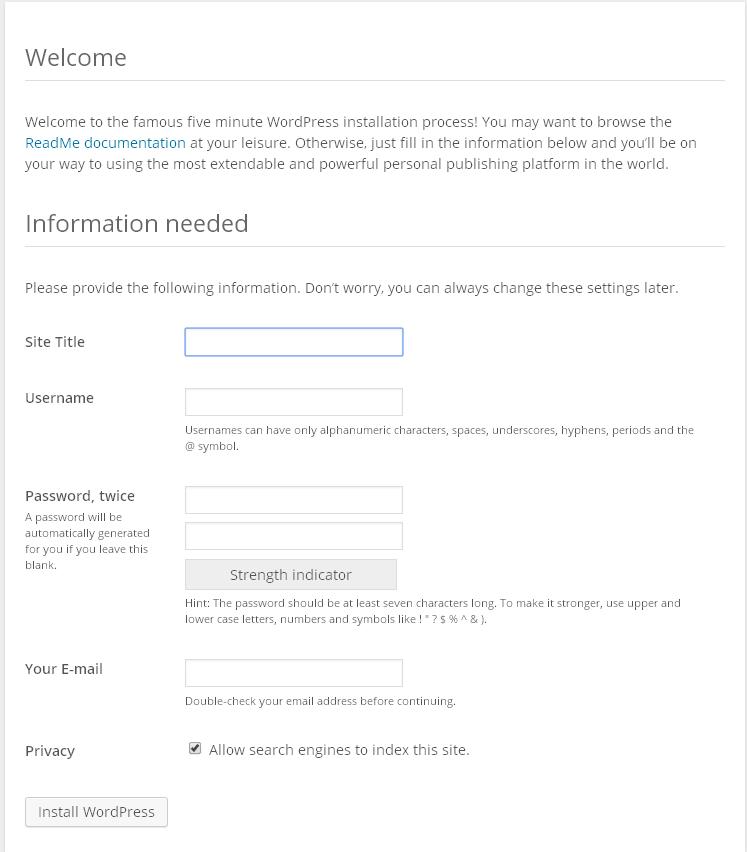
  9. Once your domain is setup, navigate to the site address and the setup prompts should come up and you can set your username and password for the website.Wordpress new site install prompt
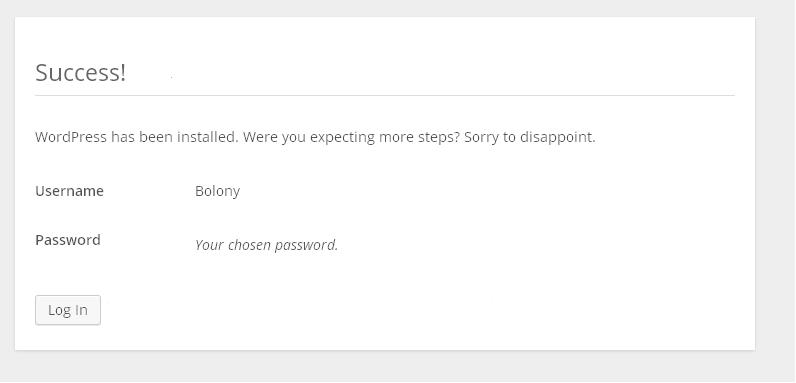
  10. Fill out the above screen (which means you did it right) – the Site Title is not the site address – it is what you are calling the site. It will automatically put this name places and it can be changed later. the username is for you to log in to the site, then the password is also for the site. The next screen should be the login screen.Wordpress Login screen
  11. Once you login, you should be at your site now. It is time to edit the site and go on to another topic.

Change the Directory Folder Name for the DotNetNuke Install in Godaddy – 2

This is the second part of the instructions on How to change the name of the root directory folder in Godaddy for a DotNetNuke installation.

How to Change the name of the root directory for a DotNetNuke Install in Godaddy – 1

OK so now we are fully backed up with the DotNetNuke install folder and a fresh copy of the database. Now we are ready to take the next steps. It is my opinion that the install folder and the database work independently of each other, and the folder name is not as important as thought. The web.config file has not been changed, only copied. So any of the keys, or database names all remain the same.

The only things that have been changed so far are:

  1. New portal alias created in the DotNetNuke portal.
  2. a fresh backup of the install folder in the FTP File Manager,
  3. a fresh backup of the database in the _db_backups folder,
  4. new folder in the IIS Management or Godaddy Virtual Directory.
  5. and a new folder in FTP File Manager with the exact same name as the new one created in IIS, with fresh copies of all files in the original DotNetNuke installation.

Items 2 and 3 above can all be brought back and everything the way it was if something messes up.

Again, these instructions are geared towards those who have a Deluxe Hosting Account in Godaddy.

NEXT is pointing to the new folder. If you are keeping your primary domain the same and in the root directory, then follow the instructions at this link:

Change the root directory folder name in Godaddy Economy Hosting – 1

If you have another domain after the primary, then read on.

  1. Log into Godaddy and go to “My Account”/ “Web Hosting”/ “Launch”
  2. Hover over “Settings” and Choose “Hosted Domains”
  3. Check the box on the left and choose the pencil or “Edit”
  4. Now browse to the new folder and press “OK”
  5. After a few minutes the Status will say “Setup”, then you can navigate to the new folder in your web browser. It should now come up with the same DotNetNuke installation as before, except now with the new directory name.

There may be a few things you need to know.

  1. You may have to wait up to 24 hours before the new virtual directory will take effect. It may not come up immediately like the domain manager will point to it. It will point to it within minutes. It takes time for the virtual directory to resolve itself. This is the one element that I was missing and I was very upset, but the next morning it worked fine. Imagine that.
  2. The paths of the images and links will point towards the other old website folder. Go through and change them, before you start adding more. All the images should be in your new directory folder, but the old folder name will be in the path of the html code. All this is stored in the database, so if you switch back, you will have to change them back. This may support a case of keeping the images in a separate folder than the portal. I don’t know if that is possible real fast.

For Godaddy Economy Hosting or to keep your primary domain in the root directory refer to these links:

Change the root directory folder name in Godaddy Economy Hosting – 1

Change the root directory folder name in Godaddy Economy Hosting – 2

How to change the DotNetNuke Install directory folder name for a Godaddy Economy Hosting website.

How to change the DotNetNuke install directory folder name in a Godaddy Economy Hosting setup. This will also work for the Deluxe setup, if you have not set up a -false domain name as your primary domain.

This is going to be two parts. Let’s get started.

Before you go into Godaddy, log into your DotNetNuke website as the SuperUser and create new portal aliases. The path is “Host”/ “Portals”/ “Edit” (appropriate portal)/ “Advanced Settings”/ “Portal Aliases”/ “Add new Alias”. Another path is “Admin”/ “Site Settings”/ “Advanced Settings”/ “Portal Aliases”/ “Add new Alias”. Your new alias should include the new desired directory folder name (www.yourdomain.com/yournewdirectoryname). The old one should be there so you can model after it. I believe all this is stored in the database, so it may not matter to do it first, as long as you get it in there sometime before you expect to navigate to it. You can also just add it straight to the database as well, I am sure.

  1. Log in to your Godaddy account and then choose “My Account”.
  2. Scroll down to Web Hosting and click on the “+” symbol then choose “Launch”.
  3. a new window should pop-up to show all the options in the hosting account. They have a new hosting menu page look, but the tabs at the top of the page are still the same “as of now”. So we will go from there.
  4. Try to follow the steps below in between doing anything, as the website will eventually be “inactive” for a while.
  5. The first step is to back up everything. The best thing to do is have a fresh backup of the DotNetNuke install folder and the database file. Start with the install folder. At the top hover over the “Tools” tab and choose “FTP File Manager”.
  6. I have found that copying an entire DotNetNuke/DNN installation folder does not ever finish. So I make a new folder, then copy 3 folders at a time into the new folder, then all the “spare” files that are left. My install has 49 directories and files. So the new folder should have the same. Now we have a fresh copy of the DotNetNuke/DNN install folder.
  7. Next is to backup the database – hover over the top tab named “Databases” and choose correctly. If you don’t see your database choose a different option. There should be a database listing with status as “Setup”.
  8. On the right hand side under “Action” choose the pencil or “edit”. There should now be an information page with all the information on the database file. Up at the top find the button “Backup” and click it.
  9. Press “OK” – you will have an opportunity to rename later.
  10. I always have to use internet explorer ftp in order to find the “_db_backups” file. This is where Godaddy sends the database backup files.  Then you can change the name of the database.
  11. Now hover over the “Tools” tab again and choose “IIS Management”.
  12. You should be seeing your original DotNetNuke install folder with a green dot on it. This is a virtual directory set as an application root. This is what is needed in Godaddy to install an application.
  13. Make sure only the Content Root is checked and click “Create” at the top. Now you need to name your new directory here. Then check the box at “Set Application Root”, and “OK”.
  14. Now make sure that your new directory is the only box that is checked and start creating any folders that are in your original install directory. Mine has app_code, app_data, bin, config, desktopmodules, images, install, portals, portals/_default, and web.config. (I duplicated the web.config on mine, but it still remains in “Pending Setup” status to this day, so maybe it is not needed.) It may take up to 24 hours for the virtual directory to resolve, so keep this in mind.
  15. After a few minutes go back to the FTP File Manager and see if the new folder you created in the IIS Manager is there. When it is there, go ahead and copy the current DotNetNuke install files into it. Change the permissions to Web Writable for the new folder in the FTP.

OK so now we are fully backed up with the DotNetNuke install folder and a fresh copy of the database. Now we are ready to take the next steps. It is my opinion that the install folder and the database work independently of each other, and the folder name is not as important as thought. The web.config file has not been changed, only copied. So any of the keys, or database names all remain the same. The only things that have been changed so far are:

  1. New portal alias created in the DotNetNuke portal.
  2. a fresh backup of the install folder in the FTP File Manager, (separate and untouched)
  3. a fresh backup of the database in the _db_backups folder,
  4. a new folder in the IIS Management or Godaddy Virtual Directory of your desired new folder name,
  5. and a new folder in FTP File Manager with the exact same name as the new one created in IIS, with fresh copies of all files in the original DotNetNuke installation.

Items 2 and 3 above can all be brought back and everything the way it was if something messes up. With this method everything can be turned back.


How to change the DotNetNuke Install Directory Folder name for a Godaddy Economy Hosting website – 2

Part 2 How to Change the DotNetNuke Install directory folder name for a Godaddy Economy Hosting Website. OK so now we are fully backed up with the DotNetNuke install folder and a fresh copy of the database. Now we are ready to take the next steps. It is my opinion that the install folder and the database work independently of each other, and the folder name is not as important as thought. The web.config file has not been changed, only copied. So any of the keys, or database names all remain the same. The only things that have been changed so far are:

  1. New portal alias created in the DotNetNuke portal.
  2. a fresh backup of the install folder in the FTP File Manager, (separate and untouched)
  3. a fresh backup of the database in the _db_backups folder,
  4. a new folder in the IIS Management or Godaddy Virtual Directory of your desired new folder name,
  5. and a new folder in FTP File Manager with the exact same name as the new one created in IIS, with fresh copies of all files in the original DotNetNuke installation.

Items 2 and 3 above can all be brought back and everything the way it was if something messes up. With this method everything can be turned back.

Now it is time to change some things around.

  1. Log into the Godaddy FTP File Manager.
  2. In the root directory find the welcome.html file.
  3. Click the box next to it and press “edit” at the top.
  4. if it comes up in its structured format, press the “Html” button to see the code.
  5. towards the top find the line that reads-  < script > { window . location = ‘http://www.yourdomainname.com/dotnetnuke’ } < / script >
    (minus all the spaces) where it says /dotnetnuke is where your current undesirable directory name is. The best thing to do is put a “< ! – -” before the opening and a “- – >” (again, minus the spaces and the quotation marks) after the closing script tags, this way you always have the original, just in case a character gets misplaced.
  6. Now that you have the script command line isolated, copy and paste it right underneath of the original. Make sure this one does not have the “html disregard” tags around it.
  7. Change the new line directory name to your new directory name that you set up in the first part, at IIS and FTP.
  8. Save or press OK and save in the next frame. Close the frame and it should load.
  9. You should now be able to type in the domain name in your browser and it will load the new folder name.

There may be a few things you need to know.

  1. You may have to wait up to 24 hours before the new virtual directory will take effect. It may not come up immediately like the domain manager will point to it. It will point to it within minutes. It takes time for the virtual directory to resolve itself. This is the one element that I was missing and I was very upset, but the next morning it worked fine. Imagine that.
  2. The paths of the images and links will point towards the other old website folder. Go through and change them, before you start adding more. All the images should be in your new directory folder, but the old folder name will be in the path of the html code. All this is stored in the database, so if you switch back, you will have to change them back. This may support a case of keeping the images in a separate folder than the portal. I don’t know if that is possible real fast.


Change the name of your DotNetNuke Root Directory Folder in Godaddy- DNN Root Directory Folder Name Change in Godaddy

This is how to change the name of your root directory in Godaddy. This may also work in other locations, but is specifically targeted to Godaddy DotNetNuke-DNN installs. These instructions were written after I acquired the Deluxe Hosting Account. The Deluxe Hosting Account lets you have multiple domains on one hosting account.

If your original DotNetNuke install was pointed to the Godaddy Root of the FTP, then there are two things you may need to do.

  1.  First is to follow the instructions at Godaddy Help to create a -false domain name as the primary domain and “Root”. Follow this link – http://support.godaddy.com/help/article/4067/setting-up-a-nonweb-accessible-root-folder. This works, and is directly from Godaddy. This is so the root folder is whateveryourdomainname-false.com is your primary domain, and all other domains are under it and pointed to whichever folder you want. This new domain name will be non web accessible and does not really exist. It is only for domain level and root clarification purposes. Godaddy has to have a main “ROOT” identifier to label your account. Remember to disable the welcome.html file if you choose this method.
  2. Follow the instructions here: How-to-change-the-DotNetNuke-Install-directory-folder-name-for-a-Godaddy-Economy-Hosting-website in order to keep your primary domain pointing to the godaddy root.

Before you go into Godaddy, log into your DotNetNuke website as the SuperUser and create new portal aliases. The path is “Host”/ “Portals”/ “Edit” (appropriate portal)/ “Advanced Settings”/ “Portal Aliases”/ “Add new Alias”. Another path is “Admin”/ “Site Settings”/ “Advanced Settings”/ “Portal Aliases”/ “Add new Alias”. Your new alias should include the new desired directory folder name (www.yourdomain.com/yournewdirectoryname). The old one should be there so you can model after it. I believe all this is stored in the database, so it may not matter to do it first, as long as you get it in there sometime before you expect to navigate to it. You can also just add it straight to the database as well, I am sure.

  1. Log in to your Godaddy account and then choose “My Account”.
  2. Scroll down to Web Hosting and click on the “+” symbol then choose “Launch”.
  3. a new window should pop-up to show all the options in the hosting account. They have a new hosting menu page look, but the tabs at the top of the page are still the same “as of now”. So we will go from there.
  4. Try to follow the steps below in between doing anything, as the website will eventually be “inactive” for a while.
  5. The first step is to back up everything. The best thing to do is have a fresh backup of the DotNetNuke install folder and the database file. Start with the install folder. At the top hover over the “Tools” tab and choose “FTP File Manager”.
  6. I have found that copying an entire DotNetNuke/DNN installation folder does not ever finish. So I make a new folder, then copy 3 folders at a time into the new folder, then all the “spare” files that are left. My install has 49 directories and files. So the new folder should have the same. Now we have a fresh copy of the DotNetNuke/DNN install folder.
  7. Next is to backup the database – hover over the top tab named “Databases” and choose correctly. If you don’t see your database choose a different option. There should be a database listing with status as “Setup”.
  8. On the right hand side under “Action” choose the pencil or “edit”. There should now be an information page with all the information on the database file. Up at the top find the button “Backup” and click it.
  9. Press “OK” – you will have an opportunity to rename later.
  10. I always have to use internet explorer ftp in order to find the “_db_backups” file. This is where Godaddy sends the database backup files.  Then you can change the name of the database.
  11. Now hover over the “Tools” tab again and choose “IIS Management”.
  12. You should be seeing your original DotNetNuke install folder with a green dot on it. This is a virtual directory set as an application root. This is what is needed in Godaddy to install an application.
  13. Make sure only the Content Root is checked and click “Create” at the top. Now you need to name your new directory here. Then check the box at “Set Application Root”, and “OK”.
  14. Now make sure that your new directory is the only box that is checked and start creating any folders that are in your original install directory. Mine has app_code, app_data, bin, config, desktopmodules, images, install, portals, portals/_default, and web.config. (I duplicated the web.config on mine, but it still remains in “Pending Setup” status to this day, so maybe it is not needed.) It may take up to 24 hours for the virtual directory to resolve, so keep this in mind.
  15. After a few minutes go back to the FTP File Manager and see if the new folder you created in the IIS Manager is there. When it is there, go ahead and copy the current DotNetNuke install files into it. Change the permissions to Web Writable for the new folder in the FTP.

OK so now we are fully backed up with the DotNetNuke install folder and a fresh copy of the database. Now we are ready to take the next steps. It is my opinion that the install folder and the database work independently of each other, and the folder name is not as important as thought. The web.config file has not been changed, only copied. So any of the keys, or database names all remain the same. The only things that have been changed so far are:

  1. New portal alias created in the DotNetNuke portal.
  2. a fresh backup of the install folder in the FTP File Manager, (separate and untouched)
  3. a fresh backup of the database in the _db_backups folder,
  4. a new folder in the IIS Management or Godaddy Virtual Directory.
  5. and a new folder in FTP File Manager with the exact same name as the new one created in IIS, with fresh copies of all files in the original DotNetNuke installation.

Items 2 and 3 above can all be brought back and everything the way it was if something messes up. With this method everything can be turned back.

It is time to take a break.

When you are ready, click on the link below to the next set of instructions.
Change Directory Folder in DotNetNuke Install for Godaddy – 2