Cordless Blower – Comparing DeWALT DCBL720P1 and DCE100B

cordless blower comparison

Cordless Blowers
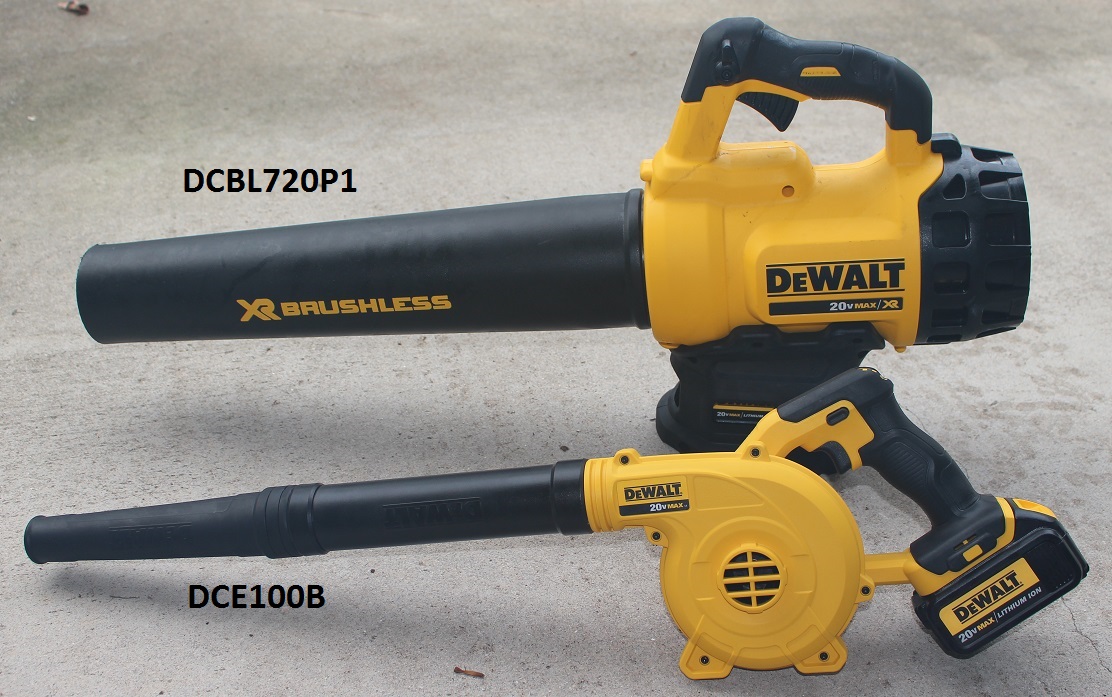
DCE100B and DCBL720P1

I recently purchased both the DEWALT DCE100B 20V MAX Compact Jobsite Blower and the DEWALT DCBL720P1 20V MAX 5.0 Ah Lithium Ion XR Brushless Blower. Both of these cordless blowers are of the 20v MAX variety. They both are very powerful, but each has unique qualities that may determine which one you purchase.

DeWALT DCE100B 20v MAX Compact Jobsite Blower

This blower is small, compact, and light. It has 3 speeds for more control. It can be used for many different applications. One application that it is not recommended for is leaf blowing. Even though this cordless blower can blow leaves and yard debris, the other larger blower is better for this. With the three speeds, this blower can be taken many places and used without making such a mess. Sometimes that is what is needed to get a large job done quicker, especially in a warehouse or work environment where a little dust kicked up doesn’t matter so much.

Cordless blower comparison

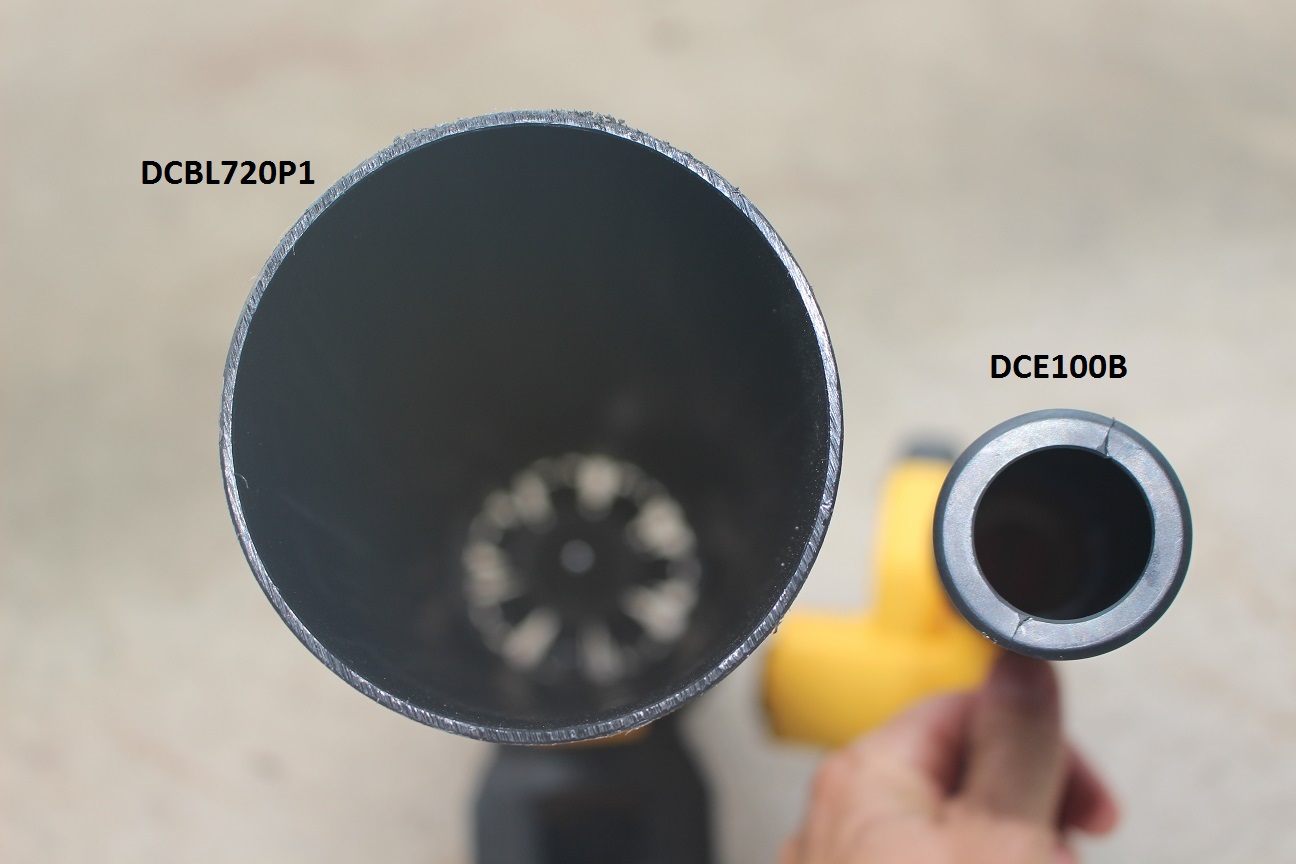
Just the airflow amount looks really different

Also, this blower comes with a inflator/deflator attachment. This can come in real handy when it is time to blow up that inflatable pool or air mattress. Then again when it is time to deflate.

I purchased the tool only option, but this cordless blower can be purchased with the charger and battery in a kit also – DEWALT DCE100M1 20V MAX Compact Jobsite Blower Kit

The DEWALT DCE100B 20V MAX Compact Jobsite Blower has a 100 CFM rating. It also has 3 speeds and variable trigger for added control.

I used this cordless blower to blow off a small driveway and it took 5 minutes. Check out the video below to see how the DEWALT DCE100B 20V MAX Compact Jobsite Blower did blowing off the driveway. Then the other blower is after.

More on the DeWALT DCE100B 20V MAX Compact Jobsite Blower

DeWALT DCBL720P1 20v MAX 5.0 Ah Lithium Ion XR Brushless Blower

This cordless blower is larger than its cousin, but is still light. The DEWALT DCBL720P1 20V MAX 5.0 Ah Lithium Ion XR Brushless Blower is a real good choice if leaves and debris are on the list. This cordless blower will power through larger areas and remove debris just like a blower that is plugged in.

At 400 CFM it has 4 times the air flow as the smaller compact jobsite cordless blower. It also has a variable speed trigger. This cordless blower has punch in its power.

In another post I used this blower to blow off a roof and a long driveway and it did great. I am not sure exactly how long it took, but the 5Ah battery that came with it lasted all the way through and still had 1 full light left on the power meter on the battery. You can see that post here – http://www.tagnaples.com/cordless-blower-dewalt-dce100b/

I used this cordless blower to blow off the same small driveway and it took 2 minutes. The video below starts at 2:50 if you just want to see how the DEWALT DCBL720P1 20V MAX 5.0 Ah Lithium Ion XR Brushless Blower performed blowing off the driveway.

More on the DeWALT DCBL720P1 20V MAX 5.0 Ah Lithium Ion XR Brushless Blower


Squirrel Feeder – Keep Squirrels Away from Bird Feeder

Squngee Squirrel Feeder

nom…nom…nom…

This squirrel feeder called Squngee is hilarious to watch. After the squirrels find it, they just keep at it until there is nothing left. After setting the Squngee up in a location that is away from the bird feeder, the squirrels will eventually find it. It is better than trying to scare away the squirrels, because if you have ever tried to scare away squirrels, they are very hard to get rid of. Hanging a Squngee is an alternative method that requires feeding the squirrels. The Squngee also keeps them busy and allows more time to pass to allow birds to visit the bird feeders.

Squirrel feeder

Squirrel found Squngee

I have spent many hours devising ways to keep squirrels from the bird feeder, but they just don’t care. The squirrels just keep coming back time after time.

I have tried spraying the squirrels with a water hose until they were soaking wet and barking at me. I remember one time the squirrel huffed away and I really felt like I had hurt its feelings. I have tried running at them making noise, scaring them into a panicked scatter, only to have them return in a few moments. I have set up a plastic owl. I devised a releasing bird feeder, just to see how far I could go and they would always come back until the bird food was gone. I felt like Donald Duck when he was getting fed up with the chipmunks, and was devising evil schemes to eliminate them. The Chipmunks always won.

Squirrel Jumping for Squirrel food

Squirrel in mid-jump after moving Squngee up to 2 feet

Find some corn cob squirrel food at the hardware or feed stores, or even amazon.com. The Squngee has lag bolt eye screws that hold the corn cobs really well. The squirrels love the corn so they will find it. Once they know the corn is there and no one is going to harass them, they will keep coming back for more.

Squirrel food

Squirrel food

Testing the distance the Squngee needs to be from the bird feeder will take some trial and error. It may be beneficial to let the bird feeder empty, then supply the Squngee with corn cobs. Let the squirrels find the Squngee and get used to it before you put bird food back in the bird feeder. This way the squirrels will know

Squngee Contents - Squirrel Feeder

Squngee Contents

The Squngee is very easy to set up. Screwing the corn cobs on the lag bolts is very easy as well. It is a process to get it to work the way you want. You are either feeding the squirrels, or trying to deter the squirrels from the bird feeder, or both.


Propagating Staghorn Fern

Propagating staghorn fern

Finding the right place to cut

One method of propagating staghorn fern is cutting and separating. Staghorn fern propagation is one way to get more staghorn ferns, other than buying more. Staghorn ferns will take off if they are placed in the right location. I have seen massive staghorn ferns around and always love them. I know that it takes a long time for the staghorn ferns to get that big, so I am always knowing this when I see them.

I am going to walk through propagating my staghorn fern by cutting a section out. I will then mount my staghorn fern cutting onto a board. Mounting staghorn fern cuttings are not too difficult and can be accomplished several ways. 3 ways of mounting staghorn ferns are by attaching to a board, attaching to a tree or pole, placing in a hanging basket. This post will focus on propagating staghorn fern by cutting and then mounting staghorn fern on a board.


Propagating staghorn fern by cutting

Cutting out the right section

The first thing to do is identify where on your staghorn fern are you going to cut. Find a section of staghorn “leaves” that you can single out without damaging another shoot of leaves. Then if the flat leaf that creates the “ball” is small and lively green color, it is a good choice. I believe finding that type of situation on your staghorn fern will help your new cutting grow better.

Propagating staghorn fern by cutting

Prying out staghorn fern cutting

Once you have identified your cutting area, take a sharp knife or utility knife and cut out the template. I stayed about 2 or 3 inches outside of the shoot of leaves on my staghorn fern. I didn’t want to damage the shoots next to my cutting area. Then take a longer knife and keep “slicing” and “sawing” until you know you are 2 or 3 inches in. Sometimes angling your cut inward will help to get it out easier. If you angle your cut inward, then make sure you are out far enough to “miss” the roots. You want to make sure and capture the roots with the least amount or no damage to them.

Propagating staghorn fern by cutting

Staghorn fern cutting in hand

Now that you have your staghorn fern section cut out, it is time to extract this from the main staghorn fern. The staghorn fern is really a big ball of layers of old leaves that are now providing moisture and decay that the ferns love to grow in. So it really should “peel” away. Sometimes it will come out easy, but most of the time it won’t. The knife doesn’t really have any strength for prying, so a flat bar or some kind of pry bar will help. Just be careful not to damage other staghorn fern shoots while prying the new cutting out. Once it gives then you should be able to take it out by hand. You will know you went deep enough when the new staghorn fern cutting pulls away and is mostly flat on the bottom. This is the hardest part of propagating staghorn fern. The rest is downhill.

Propagating staghorn fern by cutting

Staghorn fern mounting items

In staghorn fern mounting, you need to decide if you know the right place to put it. If you don’t, you may want to stick with board mounting, or hanging basket. This way, you can move the staghorn fern if you feel it is not doing well.

Staghorn Fern Mounting to a Board

I used a piece of Cedar fascia that I had laying around. It is aged and somewhat weathered. This is what I will use in mounting my staghorn fern cutting. I would not use PT lumber to mount your staghorn fern cutting. Cypress is another good one. I am not sure about pine, might not want to use Pine. Aged and dry wood should be good. I usually put a one or two fasteners where I want the staghorn fern cutting to sit. This will help hold the staghorn fern cutting up and keep it in one place. After I install the fasteners to be left about an inch or so up, I put some organic material under the staghorn fern cutting. This organic material will help hold moisture. I used some “monkey hair” from a cabbage palm. Sphagnum moss is a good organic material to use, and you can buy it online, or at a home store. Then I “push” the staghorn fern cutting onto the screws. I also make sure that my fasteners are just outside of the staghorn fern cutting’s roots. Then I take a piece of copper wire and wrap it around the board. You can also use fishing line. This may eventually get cut off. It just depends on how fast the staghorn fern cutting covers it up.


Propagating staghorn fern by cutting

Mounting staghorn fern cutting

If you want to hide your staghorn fern mounting method better, you can drill holes in the board. Then run the wire or fishing line through the holes and then around the staghorn fern cutting.

Using a board to mount the staghorn fern will allow you to move it around if needed. Also, the board can be fastened to something else without disturbing the staghorn fern cutting.

Propagating staghorn fern by cutting

Staghorn fern mounted on board

Someone once told me “Staghorn ferns like the north sun!”  I believe this to mean, place your staghorn ferns on the north side of trees or buildings. This is definitely true in South Florida, but I am not sure about North Florida.

How I Re-Hung my Huge Staghorn Fern

Propagating Staghorn Fern – Post Link

I have had this staghorn fern for a long time. It recently fell and plunged to the ground. That did not hurt it much, but it will do much better if it is hung up, or even on the side of a tree, just not on the ground. I had already tried to rework it by finding the existing wire basket and tying wire onto that. Well, that didn’t last long, so it was now time to do something a little more permanent.

Staghorn Fern Laying on the ground

Staghorn Fern Laying on the ground

So I finally found what to do with this oversized Staghorn Fern. I had an old punching bag someone gave to me that needs to go in the garbage. So I pitched the punching bag and used the hangers to re-hang the staghorn fern.

Punching bag hanger for Staghorn Ferns

Punching bag hanger

I looked around and found some old chain pieces and hooked them together. Then, I found a swingset chain to make the X that I had in my mind. 7′ of chain was what I needed and that is what I was able to come up with. If I didn’t have the punching bag setup, the chain would have to be around 9′ – 10′. A larger S hook would accept the 4 rings of chain to make the X.

7ft of chains to wrap Staghorn Fern

7ft of chains to wrap Staghorn Fern

The hanger on the punching bag was too easy. Formed an X right away with the 4 S hooks. So I went with it. Tied the chains together in the center of them to eventually form the X.

Tying Chains together

Tying Chains together

Once I did that, I laid out the X underneath the hooks. I originally had the punching bag on the south side of this tree. So before I did anything, I went ahead and moved the setup to the north side of the tree. I have had success with a piece of advice given to me long ago. Staghorn ferns like to be on the north side.

Lay chain under S hooks

Lay chain under S hooks

Now for the big moment. I got the Staghorn fern and placed it on the X underneath where I was going to hang it. This way I didn’t have to move it again.

Setting the Staghorn Fern on X

Setting the Staghorn Fern on X

Ready to hang it. I just laced the chains up to the top while going around and between some of the shoots.

Hanging the Staghorn Fern

Hanging the Staghorn Fern

Yes, it was very heavy. I should have had help, but it is too late to cry about that now. Just a thought if you are going to do this, get a hand with it.

Staghorn Fern Re-hung

Staghorn Fern Re-hung

Now it is all hung and just beautiful. The staghorn fern will grow around the chains and that is when it will not fall out ever again. I would think that those chains will last 50 years or more. The original wire basket hanger lasted over 20 years.

The wire basket inside the staghorn fern

The wire basket inside the staghorn fern

I will post on how to start a staghorn (from another staghorn) at some other point. The Staghorn fern in this wire basket is one I started and you can see it has already grown around its container. This staghorn fern is probably 4 or 5 years old now.

Here is a link to a 20′ chain from Amazon.com

10′ of chain

50 pound S-hooks

Use this for the top loop, to hook all of the chains to.

More S-hooks – Stronger than 50 pounds

Reuse Your To Go Cups for Seed Starters

Reuse your to go cups and it can help you in the garden, as well as helping the environment. Reuse the to go cup by saving the lid and the cup to create a mini-greenhouse. I know whenever I am having lunch out, one of my most favorite things is to ask for a to go cup of sweet tea.

Reuse The To Go Cup

This is actually one of the things I look for in an establishment to keep coming back, but that will be in a different post. This lid on this Ted’s to go cup fits the solo cups so I can use them as well.

Reuse - Drill the Holes So it does not fill up with water

2 – Drill Holes in the bottom of the cups so they don’t hold water. This is a 1/2″ drill bit, but even several small holes will do good.


Some cups can be used over and over, and others are a one time shot. Using this method creates an environment that does not disturb the other seedlings if they are not progressing at the same rate. This way you can take them out as they sprout and add others to that flat. Then the ones that sprouted can be taken out into the sun to get to where they can be transplanted from here.

Make sure and drill holes in the cups. Seeds won’t do well in standing water. They may sprout, but then die soon after.

Reuse and create the Mini-Greenhouse

3 – Creating a Mini-Greenhouse keeps the moisture in. This is more consistent than trying to keep watering them.

Once the lid is put back on the moisture stays in and then when the seed sprouts, just take the top off and it has its own small pot to get past the seedling stage. This method can be duplicated over and over, or just done one at a time. The lids are sometimes interchangeable so many different cups can be used and collected. The sun will make plastic brittle so keep this in mind.

Now that we are finished we can reuse some of them again!

reuse - Take the top off once it sprouts save it

4 – Once the seedling sprouts, take the top off so it can get some sun.

The seedlings that you see in these photos are sunflowers. I try to grow things that I can use, and that does not need a lot of attention. I can feed the sunflowers to my chickens, in exchange for eggs. So it is like I am growing chicken eggs.
Now these seedlings can be dealt with one at a time.

There are many different things you can do now that you have them separated. Sharpie marker can be used to identify each cup. Cross it out and write again for the next trip.

Reuse - Seedling Sprouts almost time to plant

5 – Each of the seeds sprout at different times. Depending on what you are growing, there may be days and weeks difference.

The cat with the Cacaca Call!

This cat has to be calling the bug or trying to communicate with it. This cat is one of the kittens that showed up at our home about a year ago. It is one of three kittens. We still have this one and the mom cat. We noticed the cat doing this thing like he was calling the bug to come closer. He seems to be very preoccupied with the bug in the light. About 1:40 in is where he starts the “Cacacacaca”.

 The Rest of the Story of the Cacaca Cat!

Kittens all huddled up.

One evening my son said he thought he saw a raccoon near our shed. Then the next day this cat shows up with a ringed tail. Then we noticed the kittens on our carport. The mom cat would always be close. Then we kept seeing them in different places, we were thinking the mom cat was moving the kittens to help keep them safe.

Kittens playing in the Garden


Eventually I convinced my wife and daughter that we could not keep them along with our dog, 2 other cats, and 14 chickens. So we went out the next day to round them up and they were not around. After much searching we found them in the bushes, but only 2 kittens and the mom were there. So we took the 3 to the Domestic Animal Services and were able to move forward. They would not take in the mom, but gave her all the shots and spayed her for us. I am not sure if they even charged us, but if they did it was minimal. The other two kittens they kept for adoption.

Kittens playing in the Garden


That afternoon we found the other kitten and kept him safe until we could get him back to the DAS. They were not able to take in a third kitten and would not take the mom bacause she was ferrel. So we now own two more cats. Mally(the mom) and Macho (the male kitten).

Kittens Close up playing with each other


Now they are inside cats, which we keep separated from our other two cats.


Poultry Prison 2: Chicken Coop Fence – How to keep your chickens out of the Garden


How to keep your chickens from pooping on the driveway.

How to keep your chickens from digging holes all over the yard.

How to keep your chickens from digging holes in your neighbors yard.

How to keep your chickens out of the garden.

How to keep your chickens inside the chicken coop fence.

Back after completion before second chicken fence
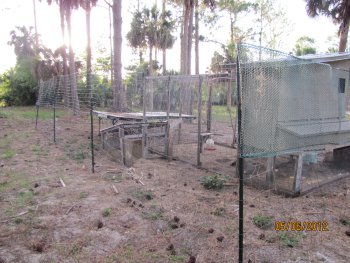
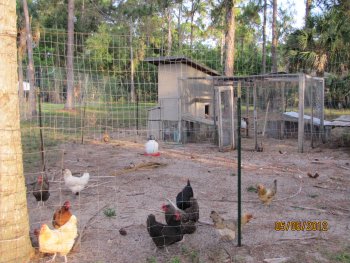
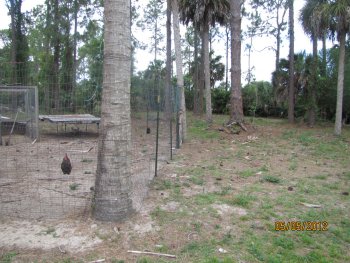
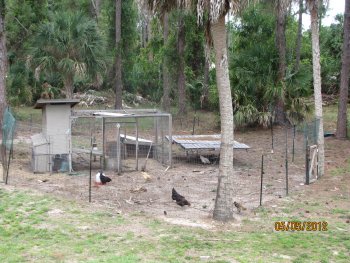
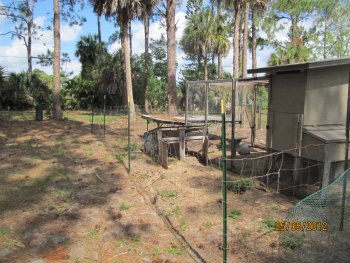
This is the next chapter of “Poultry Prison”. In the previous post, I discussed the idea of adding a small fence (3′) on top of a larger fence (4′). The test project worked and we have had no escapees. Our chickens don’t seem to mind. The final chicken fence height is 7′.

Back side after second chicken fence

 
The first go round was a test with what materials we had, in order to see if the idea even worked. It did, so we extended the fenced area so the entire coop was inside. This is ideal as it is a second barrier for them at night. We do keep them cooped up at night. We usually put them in when it is still daylight, but they will go in as soon as the sun goes down.
Front side with taller chicken fence

We are more protecting them against predators than keeping them caged up. Chickens cannot see at night, so they are easy pickings for any poultry loving predator.
Front more taller chicken fence

 
This seems to be working for the moment. The entry is the only thing now to complete. It is still at a 4′ height, and a temporary fence above it that we have to duck under to enter. You can see the little bit of shade we put in just left of the cabbage palm.


Arial shot of the entire chicken yard


Now it is complete. We will expand as the budget allows. Always looking for extra materials someone else is discarding. They use the shade we put together as a shelter when the hawks start coming around. They will disappear when the hawk circles above.

Give Me Some Water – Gardening Tip

12 noon and Discovery of dry soil is made.Sometimes all you need to do is water the plant. Most people think they are not good gardening because they don’t know anything about the details of plant life. Just because you don’t know about diseases, pests, fertilizer, growing times, signs of the moon, etc. doesn’t mean they won’t grow.

If they just get watered they will grow, some better than others.

Notice how the Dill plant on the left looks sad and not really in a good mood at all. While the one on the right looks like it is ready for action. You can really see the difference.

Just Add Water


Now adding some water to some really dry soil. This plant is very delicate and without water will soon die. Once it is past the point of no return, you can water till the cows come home and it won’t matter. 12 noon and water is applied.


1 o'clock - just one hour later


1 o’clock. Just one hour later and already, it is 50% better than it was.


2 o'clock


2 o’clock. Still improving in just two hours.


3 o'clock


3 o’clock. Keeps getting better.


5 o'clock. The damage is done


5 o’clock. hasn’t changed much. The damage is done. Time and water will bring it back. These plants have had very little fertilizer. Some granulated all purpose was put on when they were first transplanted. Greens are pretty easy to grow.
JUST ADD WATER!!!!!!