Setting Up WordPress – Content Management System

Wordpress Login screen


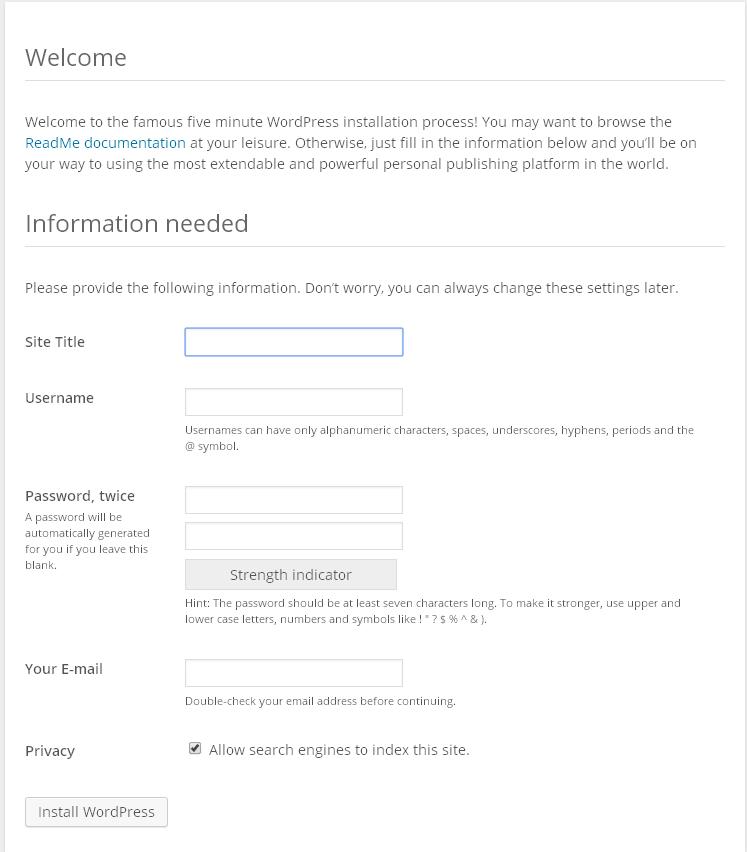
Setting up a WordPress website is really easy and you can be creating content on the web in no time. After navigating to the website you created with Godaddy and logging into the website via the wordpress login screen (on left), it is time to personalize it. The instructions to install a wordpress content management system with Godaddy can be found here – http://www.tagnaples.com/how-to-install-wordpress-on-godaddy/. I have listed 10 things to do when you first login to the site.

  1. go to “Settings” and then choose “General” – Make sure the information here is correct. First your Site Title and Tagline, these are automatically put into themes (or you can choose not to).
  2. Choose Appearance and click “Themes”. Look at the three WordPress themes that are available. If you like one, choose it, or go with the one that is on. If you don’t like them, choose “Add New” and see if you can find one you like. Once you add some themes to your site, you can change the look of the site without having to change any content.
  3. In Appearance go to “Customize”, under Site Title and Tagline you can change it or make it not show up. Then under Static Front Page you can change your Front Page Setting (This is your Home Page or Splash Page)
  4. In Appearance choose “Header” – This is the image at the top of your website (if you want one). Some themes allow you to have several header images to choose from as well as a random image on each page or post.
  5. Now it is time to create a page or edit the existing pages. WordPress is a blog by default, but you may want to create a home page to explain what the blog is about. You may just want to create static pages and not have a blog. WordPress already has one post and one page and one comment. It is a good idea to go in and edit these and that will give you some experience with the process. (deleting the comment so it doesn’t look so much like a new site) You can do this by going to “Posts” then “All Posts”, and “Pages” then “All Pages”.
  6. Creating a Menu will let you name pages and transfer the menu to different themes. You can add pages, posts, categories, and even links as pages. There are widgets that can put menus on different pages around the website. This works good for dropdowns so all the choices can be exposed when dealing with touch screens.
  7. Go back to “Settings” and choose “Permalinks” – Choose the setting that you like, then the page name will happen by default. Most of the time you can edit these settings per page.
  8. “Settings” then “Discussion” – This sets the default permissions for the comments. You can set the comments for each page individually if needed.
  9. Once you get your page up close to the way you want you can go to “Appearance” then “Widgets” and add or remove items from the pages. Different themes will have different widgets so you may have to scroll through and find a theme that is set up the way you want.
  10. Once you find a theme you like or close to it, you can go to “Appearance” then “Theme Options” (if there is one, some don’t have options). Different themes have different options. These can be colors, fonts, post page settings, etc. One theme I found that is fully customizable, even to the tune of having subthemes  is Aspen. If it doesn’t have any options then you can go to  “Appearance” then “Editor” and change files, this changes the actual files in the theme. You may want to consult Google for that.

Now it is time to go and create some content!

How to install WordPress on Godaddy Hosting

wordpress godaddy

This post will explain how to install WordPress on Godaddy Hosting. The best way to install WordPress on Godaddy is to manually download the latest worpress zip file from www.wordpress.org. Then upload the contents of the wordpress file to a file folder on Godaddy. If your installation is not working, make sure your Godaddy hosting plan supports .php. You can always check this before you go through all the steps below. These instructions are for a Deluxe Hosting Account. The Economy Hosting Account may have a welcome.html file to edit instead of pointing in the hosted domains in step 8.

  1. Go to the hosting control center in Godaddy and setup a new MySQL database. You will need the database name, database password, and the hostname later.
  2. Create a folder within the Godaddy file manager. This new folder you create will hold a single installation of wordpress, or a single site. (you can point many domains to a single site within godaddy) Make sure and change the permissions of this new folder to read and write, uncheck inherit (check your folder and click permissions up top, you don’t have to check reset all children to inherit).
  3. Download the latest wordpress zip file from www.wordpress.org to your computer.
  4. Modify the new wordpress file folder so that only the contents are in a zipped file. When you download the original zip file, it will have a wordpress folder in it, then the contents. If you have windows you can just select the contents and then right mouse click and “send to” compressed file. Then move this zip file to a location of your choice (where you can find it when it is time to upload). Upload this zip file to your Godaddy file manager.
  5. With your file manager “unarchive” the newly uploaded zip file to the new folder you created. Your folder should not have another folder inside called wordpress and more folders inside that one. Only the contents of the original wordpress folder (wp-admin(folder), wp-content(folder), wp-includes(folder), and several .php files) should be in your new folder.
  6. In the hosting control center in Godaddy, click IIS Management. This will bring you to the virtual folder setup. Create a folder with the “exact” same name as the new folder you created in step 2. Make sure and check Set Application Root. (This is very important!)
  7. Now you need to go back into the file manager and edit the wp-config-sample file. Either edit with the godaddy editor or download to your computer and edit. There are 4 items to change – ‘database_name_here’, ‘username_here’, ‘password_here’, ‘localhost’ (leave the ‘   ‘). Save and then change the name of the file to wp-config.php and save or upload where the other file was. All this can be done inside of the Godaddy file manager. Check the file, press edit, edit the file, then rename the file.
  8. Go to the Hosted Domains button and make sure the website is pointing to the folder with the wordpress install.
  9. Once your domain is setup, navigate to the site address and the setup prompts should come up and you can set your username and password for the website.Wordpress new site install prompt
  10. Fill out the above screen (which means you did it right) – the Site Title is not the site address – it is what you are calling the site. It will automatically put this name places and it can be changed later. the username is for you to log in to the site, then the password is also for the site. The next screen should be the login screen.Wordpress Login screen
  11. Once you login, you should be at your site now. It is time to edit the site and go on to another topic.

Add Facebook Like Button to WordPress Website

Facebook Like Button
The first step in adding a facebook like button to your wordpress website, is you must have an account on facebook.com. If you do not, make sure you Sign up for Facebook first. You can add the button without having to identify the page. Now that you have an account on Facebook we can get started.

Go to https://developers.facebook.com/docs/plugins/like-button/. This is the start. Facebook will let you create the buttons and get all the way finished, but if you try to get the code, Facebook will want you to log in. Keep this in mind. This code is not particular to your account yet, but will be when you press the like button after it is on the website.

Facebook Like Button

The Facebook Like Button Options Screen

This is what you should be looking at. Now it is time to customize your like buttons. Depending on where you want them is depending on how much space you need to render. As you can see on my website, I have them above the content. I also have a google plus button next to it.

  1. If you want to put it site wide, then maybe you want it to “like” whatever page it is on. If this is the case, then remove the text in URL to Like, and leave it blank. If you want to put it on a specific page and make sure that the “like” goes to that page, or maybe just the home page, then put that url here.
  2. The width can be played with a little bit. I have mine set to 250. This way it lets the other button sit next to it, instead of underneath of it. Depending on the “Layout” is depending on this setting. Just leave it blank to get the default width.
  3. The Layout gives you 4 options of how your button will look and what information it will display. As you click on an option, it will update the sample below.
  4. Action Type – to like or recommend. Everyone knows what the like button is for. If it goes right, a popup should allow you to comment and then it will post the link on your timeline. The recommend should do the same thing except say that you “recommend” instead of “like”.
  5. Include Friends Faces – Checking this box should bring up the thumbnails of people who like this page. It will be a much bigger rendering, but may look good on your website.
  6. Include Share Button – Include it. This gives people the option to share your link, which should do better for SEO.
  7. Now it is time to get the code. My settings are below.

Facebook Like Button Options Chosen

The screenshot above is the settings I chose and resembles the Like and Share buttons on my pages.
Once you have decided on your settings. Press the “Get Code” button. You should see a popup like the one below. (Facebook will want you to login to get the code)

The Facebook Like Button Code

Facebook Like Button Plugin Code

This is the code you will need to render the button(s). Copy and paste it into a widget from your WordPress Dashboard. You may have to experiment with the div tags to get it to sit where you want as it relates to other things on the page.

The first section of the Facebook Like Button code is needed only once on the page. I know I have it 2 times on the page and it works fine, so I would expect it to work for you also.

The second set of code is the button itself and exactly where you want it to show up.

Good Luck!