Drone Crash – Holy Stone HS720-4K Broken Arms

Holy Stone HS720-4K – Replacement Arms

Holy Stone Drone Crash Broken Arms 
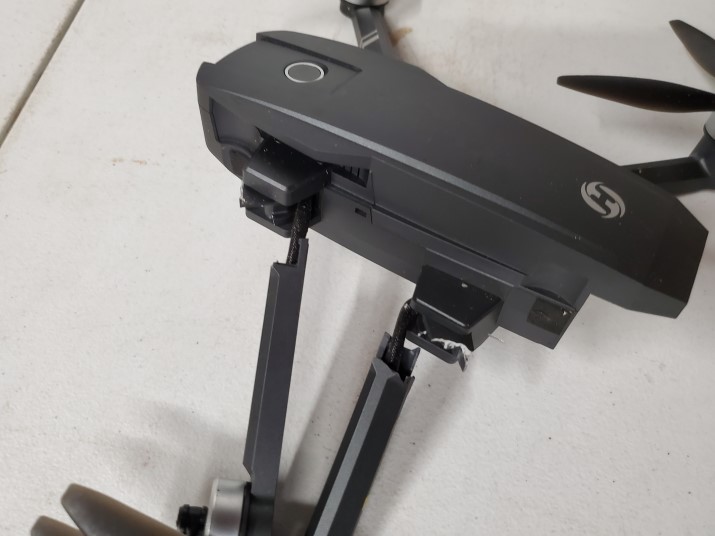
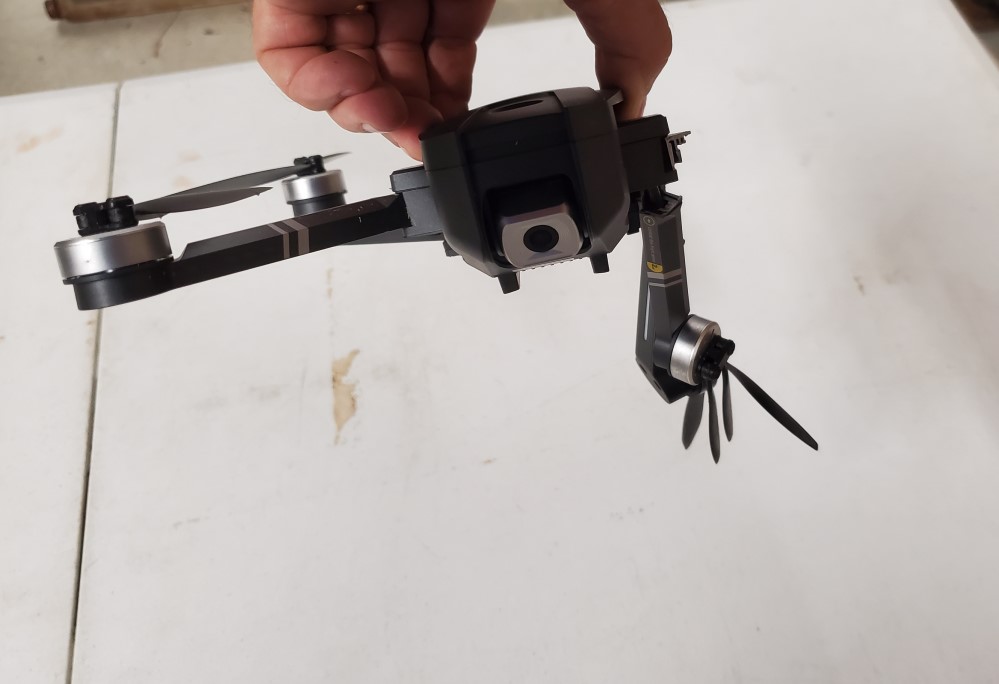
In just a split second my Holy Stone HS720-4K drone came crashing to the ground. Luckily, only 2 arms broke clean. I think I can fix it. The Holy Stone HS720-4K that I received as a gift is now broken. I crashed my drone by pressing the RTH(return home) button and the quadcopter drone caught the outer fringe of a pine tree limb and came crashing to the ground. Of course, you would think it would auto-correct and recover, but that is not the case in this case. I wonder if drones have auto-correct / auto-recover in some of the more expensive models from DJI, Autel Robotics, SHIYANLI, or YANSHU.

This SHIYANLI drone is $18,000. This drone is designed for work. Agricultural spraying and the like. I bet it has some serious programming to help with flying and NOT crashing.

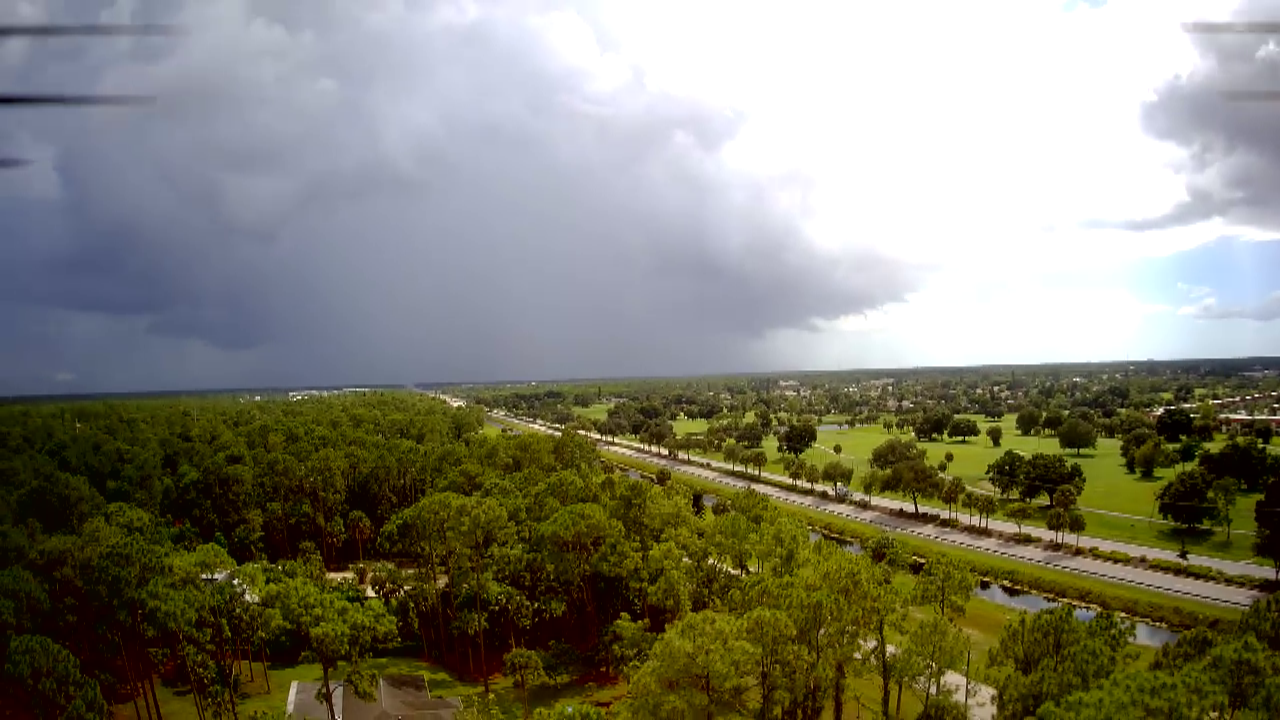
Some of the more popular brands of drones have less costly versions that are not meant for commercial applications. Then they also have the big $$$ drones for photography and also drones for inspections.  Peforming inspections with drones has become more popular in the last few years as the camera technology has improved on the drones. 4K is now a standard item on most drones.

Holy Stone Quadcopter Drone with Broken Arms

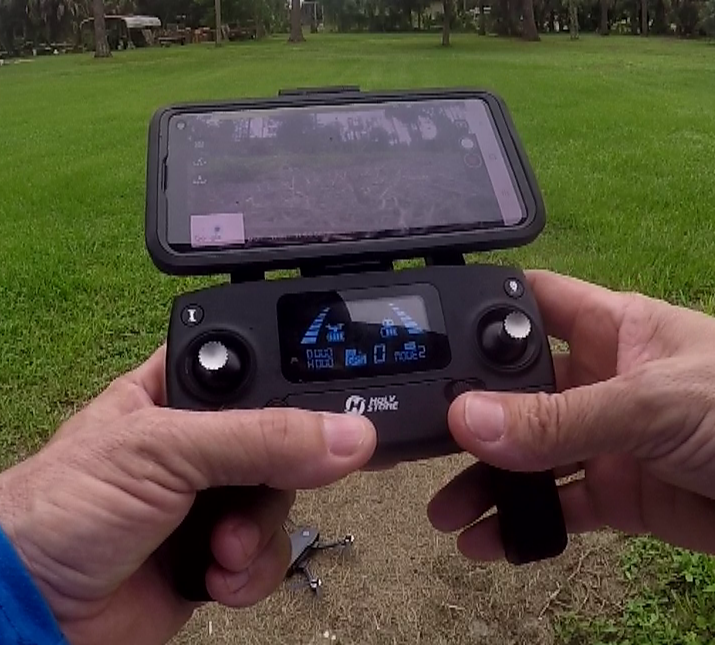
The Holy Stone HS720-4K is more of an amateur drone that does have a pretty decent camera. That is along with ease of use setting up and flying. Besides all that it is a somewhat simple process of downloading the videos and photos. This is the part that I like, because saving the better videos and photos to use in social media and YouTube is what the camera is for. I use Android, but iPhone has to be even easier right? I wouldn’t know.

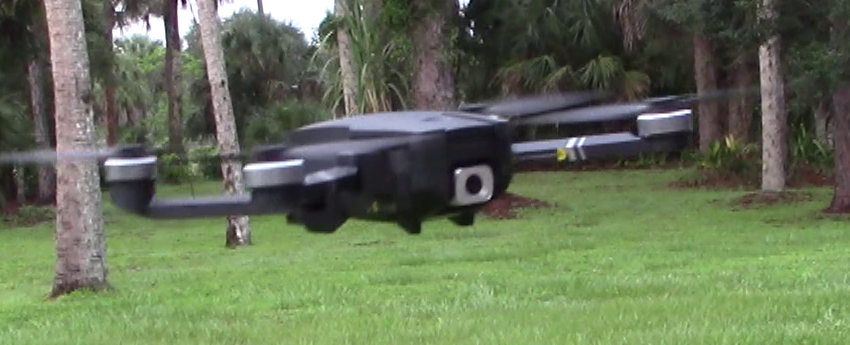
Flying a Quadcopter drone is much different than flying a helicopter or airplane from RC days gone by. The quadcopter drone is very responsive to the controls. It’s almost like playing a video game, except that you don’t get a new life or regenerate once you’ve crashed. I mean, unless it doesn’t break. Once that happens, you’re down and out until it get’s fixed, or you buy a new drone.

Quadcopter Drone Holy Stone in flightAll in all, I am very happy with the Holy Stone HS720-4K. I don’t have any use for it in my job, but could see where it might come into play at some point. I believe, in order to use a drone commercially, you must be licensed by the FAA. I am not sure about that. Either way, the quadcopter drone is much more forgiving than when I tried to fly an RC airplane many years ago. The camera is also a plus. I still haven’t been able to get the 4K, but I think I know why and hopefully will be able to blog about it soon.

Entry Level Drone – Video Capturing Quadcopter Drone

Drone Holy Stone in flightThe HS720 by Holy Stone is a great starter drone. This drone is very well built and seems on the heavier side as opposed to the other ones I have seen. Not nearly as expensive as a “Professional” rated drone like the DJI Mavic 2 Pro or the Yuneec H520 Multicamera Drone. This drone has many of the features a professional drone has, but may not be as precise. One of the features that is very forgiving to the pilot is the RTH or Return to Home function. This is the function that lets the pilot relax and by pressing 1 button the drone will return to where it took off. The HS720 also has an automatic RTH function when it gets low on power. There are many settings that can be customized within the flight application on your smartphone.

Holy Stone Search Page

So after connecting to the drone’s WiFi signal, the camera is then visible through the smartphone app. The phone is placed on the remote or transmitter and can be piloted by viewing the camera. Old schoolers, like me, will still look at the drone to see where it is flying. After going through the instructions and initially setting up the drone, 2 buttons put the drone in the air. Then it is a question of “where to we go now?” I like to go above all the trees and look around. The camera is also movable up and down from the remote, and side to side by turning the drone. Once you get used to flying it, it’s just like riding a bike. Except with around 50 more functions and settings.

Drone remote with Smartphone attachedThe HS720 drone also has “follow me” and “point of interest” functions.

The “follow me” function basically follows the remote around. Seemed like it wanted to stay around 20 feet behind me, but may get confused after a couple of flights. I believe learning how to calibrate the drone is a must. I think that when it gets bumped around a bit, it needs to be recalibrated.

The “point of interest” is a little different. This function is also called “orbit”. Find a point of interest and place the drone 15 feet or so out from the point of interest, and the drone will orbit around this point. Now this is a customizable distance. So the camera then focuses on this point of interest and just keeps going around and around until you turn off the function. Then it just hovers where you turned off the function waiting for your command.

Arial View Drone CameraDefinitely need some space to fly a drone. Buildings and trees around is not a good mix, especially for new pilots. What happens is the drone gets turned around and then you get confused and start making it go this way and that way and bump into something. It will just crash at that point.

Either way, this is a good entry level drone. The kit that I got had 1 battery and some extra blades, and a nice case. There are some other kits that have 2 and 3 batteries. The battery is said to last 26 minutes. This is plenty of time, but if you have a task ahead, you may want to get extra batteries.

They are saying the camera is 4K and there is a setting for 4K (3840 x 2160). I was only able to get 1280 x 720 resolution. Still decent resolution. The instructions say the video is stored on the TF card and in order to view the phone has to be connected to the drone’s wifi. I haven’t tried, but maybe if I plug in my phone to the computer in order to download the video while the drone is turned on and my phone is connected to its WiFi it will be available. I’ll have to put that on my list.

IR Illuminator Security Camera Floodlights – 4 Light Comparison

Recently I bought 4 IR Infrared Illuminators for my security cameras to compare and test in order to come up with one that I liked. I have a situation where the IR light my existing cameras does not have anything to bounce off of. This is due to them being 2 stories in the air and also there is space around my home. So I had bought another IR Floodlight for the security cameras that I wrote up here:http://www.tagnaples.com/improve-security-camera-night-vision-ir-illuminator-cctv/. The IR Illuminator floodlight really did the trick. Well, they stopped selling that particular brand so I had to come up with another one. I think I really like the Univivi IR Illuminator,850nm 12 LEDs Wide Angle IR Illuminator for Night Vision,Waterproof LED Infrared Light with 12V DC Power Adapter for IP Camera, CCTV Security Camera.

So the 4 IR Illuminator Floodlights I am comparing are :

  1. JC Infrared Illuminator 12-Led 90°Wide Angle High-Power IR Illuminator for 850nm IP Camera CCTV Analogue Security Surveillance Camera
  2. JC Infrared Illuminator 4 Led High Power LED IR Array Illuminator IR Lamp Wide Angle for Night Vision CCTV and IP Camera
  3. Univivi IR Illuminator 90 Degree Wide Angle 8-LEDs IR Infrared Light for Security Cameras.
  4. Univivi IR Illuminator,850nm 12 LEDs Wide Angle IR Illuminator for Night Vision,Waterproof LED Infrared Light with 12V DC Power Adapter for IP Camera, CCTV Security Camera

JC IR Illuminator 12 LED Security Camera Floodlight

JC IR Illuminator 12 LED Security Camera floodlight will definitely light up the area. This is a larger floodlight that looks similar to the other IR Illuminator floodlights that I received and installed in the past. This light is billed as a 90 degree angled light, but seems to be limited on scope once it has the space.

With items to shine and bounce light off, this light will do the trick with larger areas. This light did come with a Power Supply.

 JC IR Illuminator 4 LED Security Camera Floodlight

The JC IR Illuminator 4 LED Security Camera floodlight is a bit smaller than the other floodlights, but still puts out some light. I think this IR floodlight would be ideal in a tighter area. Also would work where the light just needed to be smaller.

This particular one did not come with a power supply.

Univivi IR Illuminator 8 LED Security Camera Floodlight

The Univivi 8 LED IR Illuminator Security Camera floodlight is a smaller version of the 12 LED models. This light still puts out some light for its size.

It is another candidate for when size of the light due to spacing requirements is warranted. This light still compared to the 12 LED lights. This light did come with a Power Supply.

This light looks like a replica of the other lights.

Univivi IR Illuminator 12 LED Security Camera Floodlight The Univivi 12 LED IR Illuminator Security Camera Floodlight is definitely my pick from this purchase. This light really lights up the area and even from a distance. When there is much space to cover this light is needed to see movement. I am looking mostly for animals, but if people come through, I can definitely see some features. This light did come with a Power Supply.

The first post where I had originally tested 2 lights http://www.tagnaples.com/improve-security-camera-night-vision-ir-illuminator-cctv/

Youtube Video of the first testing – https://youtu.be/2iOsbcCX0F4

Youtube Video of testing 4 more lights – In Progress


Make Shade Where There is no Shade

When you are trying to find a place to put plants, sometimes you need to put them in the shade. If the shade is not readily available, there are products that you can purchase that will create shade where ever you want. One product that I use is Easy Gardener Sun Screen Fabric (Reduces Temperature Up to 15 Degrees, Provides 75% More Shade) Tan Shade Fabric, 6 Feet x 20 Feet

Here is a link to the amazon page with the search results of “Sunscreen Fabric” – Check it out.       https://amzn.to/2oGPaoI

Owl Car Cam – Live View Dashcam Just Like Ring Doorbell and Spotlight Cam

The Owl Car Cam Dashcam is a unique product that is connected to the LTE network, same as mobile phones. Which means that it is connected and you can connect to it remotely. This is especially good when you are out and the car is not near a wi-fi connection.

If you are a fan of the Ring Doorbell Cam and Lighting Live View Products, then this dashcam is a similar concept. Just pull up the app and click LIVE VIEW and you can see right out of the windshield of your vehicle. You can also see the inside of the vehicle as the The Owl Car Cam Dashcam also has an interior camera to see what is going on inside the vehicle.

One downside that may not be apparent up front is there is a service fee after the 1st year of service, but if you don’t mind that then this dashcam is a great find. I was connected right out of the box, without signing up or creating an account. I would expect this to be the case for the first 365 days. So they must send reminders through the app when the year is coming up for renewal. We’ll see. Without the service, you don’t get the LIVE feature and connection to LTE Network. I would imagine the bluetooth and WiFi direct connections will then allow you to download clips as the video data is stored on the unit itself.

Owlcam App Screenshot

Screenshot of Owlcam App

The setup is very easy, the connection to the app is very easy. Very few settings to mess with and is recording right from the start. Once you have it installed and are getting use to seeing it on your dash you can start bookmarking clips. Say “OK PRESTO!” and it will sound and you can then say the name of the clip. On the app there is a clip section and this period of time will be saved in that section. Otherwise you can go to the History and see the past. I went back about 3 1/2 days. The camera does not record when the vehicle is sitting. If something hits the vehicle, or someone walks by the vehicle, then the camera trips and starts recording. Then you get a notification on your phone from the Owl Cam App.

The Owl Car Cam Dashcam connects right to the OBD outlet in your vehicle so the only real setup is hiding the wire, which a tool is provided to get the wire behind the dashboard as much as possible. Read up on the vehicles that the Owl Car Cam will work in to make sure it works in yours.

Owl Car Cam Download to Phone

Owl Car Cam Download to Phone

There really is no direct connection to the Owl Car Cam to download videos. I was hoping to be able to download and store some footage, but it is sporadic. There is no SD card to take out as opposed to the Garmin DriveAssist 51 North America LMT-S and the Thinkware Dash Cams. The Owl Car Cam will only allow downloading of videos through the app. There is the ability to email, text, upload to Facebook, options for video clips among others. I successfully used the bluetooth function to dowload a clip or two. It is qwirky to use as you then have to plug the phone into the PC and get into the data files to retrieve the video. Then it will only save it as one name, so you can only do it for one video each time. There is a way to rename from the phone and store multiple videos at one time. The bluetooth function is a direct connect from the phone to the Owl Car Cam unit, but cumbersome to use in bulk.

Owl Car Cam Live View

Screenshot of a LIVE VIEW on the Owl Car Cam

The best way to download the named clips from OK PRESTO and the history clips is to use the download/share button from the viewing screen of the app. You just put the timeline where you want it and choose the 1 minute or 5 minute option. The video transfers to the phone by the LTE network. The videos are named uniquely and, in theory, can be as many as your phone has memory for. Retrieving them on Android is in Movies/Owlcam. Definitely easier than the bluetooth option.

A few words about the Garmin Garmin DriveAssist 51 North America LMT-S. This is a GPS unit with a dashcam built in. The dashcam footage is available by Micro SD Card. There is an app that connects your phone to the unit, but is more of an updating type of thing. This is a mobile unit and can be taken with you in whatever car you are in. I am thinking The Owl Car Cam Dashcam will as well, but the wire is buried and you have to connect to the OBD instead of the 12V receptacle.

The Thinkware Dash Cams are not so mobile, as they stick to the windshield with a receiver instead of a suction cup. Still uses the Micro SD Card for the video storage and has apps. Both of these units are an always on type of camera whereas The Owl Car Cam goes into Guard Mode when stopped for a while, then turns on the camera once movement is detected.


Improve Security Camera Night Vision – IR Illuminator CCTV

Infrared Lighting for Security Camera
I recently was looking for infrared lighting for some videos and stumbled across IR Illuminators. So I purchased a couple from Amazon and tested out a few. I was looking for floodlights because I have a 2 story home in a rural area and there is a lot of space. This means there is not a lot for my existing security cameras infrared to bounce off of. I have a really dark spot that I was able to get good results from. The before and after picture is self explanatory.

The power to the lights is a 5.5mm X 2.1mm DC so it was able to plug right in to my existing cameras BNC wiring. I just had to get a splitter. I got some short splitters and also some longer splitters. You just have to see what your situation is, because the BNC will still be the same length. It might be wise to get a splitter and a short extension, instead of an extension on the splitter.

JC 210 IR Illuminator
I tested a JC 210 (JC 210ft Infrared Illuminator, 20 LEDs 90 Degree Wide Angle IR Illuminator for Night Vision,Waterproof LED Infrared Flood Light Black). The JC 210 is the infrared light that is more the Spotlight.

Vikylin IR Illuminator
I also tested a VIKYLIN IR (VIKYLIN Infrared Illuminator 850nm 15 LEDs 90 Degrees Wide Angle IR Illuminator IP67 Waterproof Night Vision LED Infrared Light for IP Camera, CCTV Security Camera). The VIKYLIN IR is the infrared light that is more spread out. UPDATE 5/25/19: The VIKILYN is no longer available I am recommending the JC Infrared Illuminator 12-Led 90°Wide Angle High-Power IR Illuminator for 850nm IP Camera CCTV Analogue Security Surveillance Camera as a viable replacement.

Both of these lights had the same specs so I thought one would be brighter or wider or something, but they were two totally different lights. The JC 210 is a spotlight, but has some serious power. The VIKYLIN IR is also powerful, but the light is spread out, which is what I wanted.

These are the 4 products that I bought from Amazon and tested. UPDATE 5/25/19: The VIKILYN is no longer available I am recommending the JC Infrared Illuminator 12-Led 90°Wide Angle High-Power IR Illuminator for 850nm IP Camera CCTV Analogue Security Surveillance Camera as a viable replacement. I still have installed the (VIKYLIN Infrared Illuminator 850nm 15 LEDs 90 Degrees Wide Angle IR Illuminator IP67 Waterproof Night Vision LED Infrared Light for IP Camera, CCTV Security Camera) permanently and will wait to see if I can find an application for the JC 210. I did and the JC210 is exactly that 210ft. So if there is a distance to cover, then this spotlight will work better. I will be writing up the application soon.

Also after installing a few more IR Illuminators around the property, I have an update for the power extension scenario. The short splitters and a plain extension are the way to go. The reason is that the power is already to the security camera. That is where the split needs to happen, then an extension to the IR Illuminator from there. An longer extension/splitter combo may work (2 – 10 foot depending on application), but it just depends on the distance the IR Illuminator ultimately is away from the security camera. Here are a few more options for plain power extensions.

IR Infrared Illuminators Best Sellers

IR Infrared Illuminators Best Sellers

IR Infrared Illuminators Best Sellers

Cobra Guppy – The Guppy With Stripes

Guppy WebCam - Updated

Click this image to go to the Live Guppy WebCam Page

The Cobra Guppy is a variegated type of guppy that resembles several different color variations. My Cobra Guppies are yellow in color with leopard type stripes on their body and tails towards the tail. Photos of them follow. I have set up a webcam for this fish tank that updates a still image every 15 seconds.

Female and  Male Cobra Guppy

Female and Male Cobra Guppy

There are some other color variations that I have seen that are still called Cobra Guppy. I chose these because of the striping patterns.

Male Cobra Guppy

Male Cobra Guppy

Male Cobra Guppy

Male Cobra Guppy

Male Cobra Guppy

Male Cobra Guppy

Click on the images of the Guppies to see a larger version of the image. The designs on the sides of the males are pretty neat.

Male Cobra Guppy

Male Cobra Guppy

Female and  Male Cobra Guppy

Female and Male Cobra Guppy

Female Cobra Guppy

Female Cobra Guppy

Male Cobra Guppy

Male Cobra Guppy

Male Cobra Guppy

Male Cobra Guppy

Female Cobra Guppy

Female Cobra Guppy

Loggerhead Shrike Photos

These Loggerhead Shrike photos were taken June 2013.

Loggerhead Shrike


This bird (Loggerhead Shrike) was discovered on my back porch on the rail one morning and it caught my attention. I noticed that it was not moving. I got the camera out and was able to snap a shot or two and it flew off. After 30 minutes or so, I noticed it on a tree limb. It stuck out, because I don’t remember seeing any of these birds around before. I noticed that it would eventually fly down to the grass and capture something and fly right back up to where it was.

Loggerhead Shrike

Then it would wait patiently until repeating the process. Throughout the day I was able to get a few good photos and also watched it grab a few bugs along the way. Every now and then I would be able to see it attacking an insect of some sort.

Ever since this day, I have been noticing the Loggerhead Shrike almost everywhere I go. On a wire it looks like a mockingbird, until the light gets on it. Then you can see the mask and know the Loggerhead Shrike is just waiting and watching!

Loggerhead ShrikeLoggerhead Shrike with food

Add Facebook Like Button to WordPress Website

Facebook Like Button
The first step in adding a facebook like button to your wordpress website, is you must have an account on facebook.com. If you do not, make sure you Sign up for Facebook first. You can add the button without having to identify the page. Now that you have an account on Facebook we can get started.

Go to https://developers.facebook.com/docs/plugins/like-button/. This is the start. Facebook will let you create the buttons and get all the way finished, but if you try to get the code, Facebook will want you to log in. Keep this in mind. This code is not particular to your account yet, but will be when you press the like button after it is on the website.

Facebook Like Button

The Facebook Like Button Options Screen

This is what you should be looking at. Now it is time to customize your like buttons. Depending on where you want them is depending on how much space you need to render. As you can see on my website, I have them above the content. I also have a google plus button next to it.

  1. If you want to put it site wide, then maybe you want it to “like” whatever page it is on. If this is the case, then remove the text in URL to Like, and leave it blank. If you want to put it on a specific page and make sure that the “like” goes to that page, or maybe just the home page, then put that url here.
  2. The width can be played with a little bit. I have mine set to 250. This way it lets the other button sit next to it, instead of underneath of it. Depending on the “Layout” is depending on this setting. Just leave it blank to get the default width.
  3. The Layout gives you 4 options of how your button will look and what information it will display. As you click on an option, it will update the sample below.
  4. Action Type – to like or recommend. Everyone knows what the like button is for. If it goes right, a popup should allow you to comment and then it will post the link on your timeline. The recommend should do the same thing except say that you “recommend” instead of “like”.
  5. Include Friends Faces – Checking this box should bring up the thumbnails of people who like this page. It will be a much bigger rendering, but may look good on your website.
  6. Include Share Button – Include it. This gives people the option to share your link, which should do better for SEO.
  7. Now it is time to get the code. My settings are below.

Facebook Like Button Options Chosen

The screenshot above is the settings I chose and resembles the Like and Share buttons on my pages.
Once you have decided on your settings. Press the “Get Code” button. You should see a popup like the one below. (Facebook will want you to login to get the code)

The Facebook Like Button Code

Facebook Like Button Plugin Code

This is the code you will need to render the button(s). Copy and paste it into a widget from your WordPress Dashboard. You may have to experiment with the div tags to get it to sit where you want as it relates to other things on the page.

The first section of the Facebook Like Button code is needed only once on the page. I know I have it 2 times on the page and it works fine, so I would expect it to work for you also.

The second set of code is the button itself and exactly where you want it to show up.

Good Luck!