Entry Level Drone – Video Capturing Quadcopter Drone

Drone Holy Stone in flight
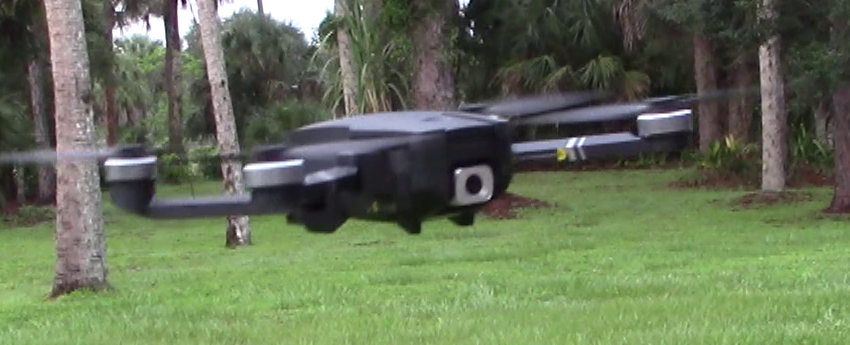
The HS720 by Holy Stone is a great starter drone. This drone is very well built and seems on the heavier side as opposed to the other ones I have seen. Not nearly as expensive as a “Professional” rated drone like the DJI Mavic 2 Pro or the Yuneec H520 Multicamera Drone. This drone has many of the features a professional drone has, but may not be as precise. One of the features that is very forgiving to the pilot is the RTH or Return to Home function. This is the function that lets the pilot relax and by pressing 1 button the drone will return to where it took off. The HS720 also has an automatic RTH function when it gets low on power. There are many settings that can be customized within the flight application on your smartphone.

Holy Stone Search Page

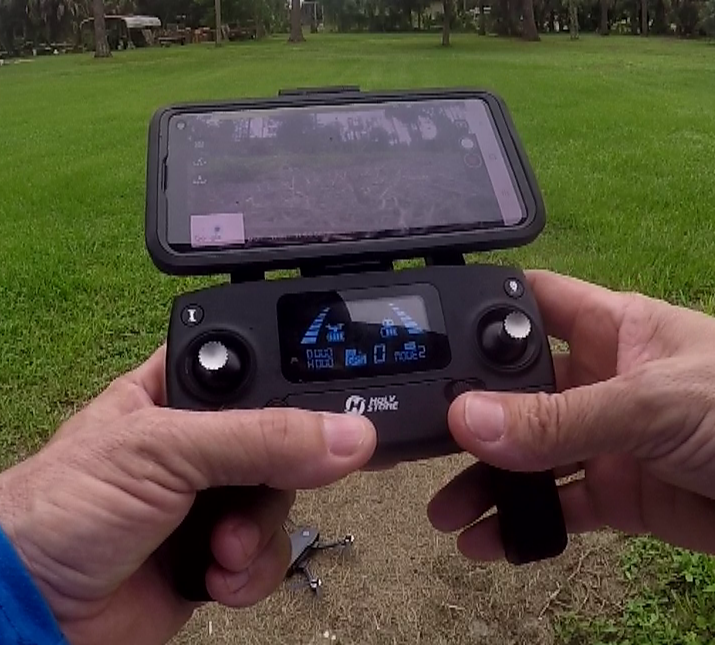
So after connecting to the drone’s WiFi signal, the camera is then visible through the smartphone app. The phone is placed on the remote or transmitter and can be piloted by viewing the camera. Old schoolers, like me, will still look at the drone to see where it is flying. After going through the instructions and initially setting up the drone, 2 buttons put the drone in the air. Then it is a question of “where to we go now?” I like to go above all the trees and look around. The camera is also movable up and down from the remote, and side to side by turning the drone. Once you get used to flying it, it’s just like riding a bike. Except with around 50 more functions and settings.

Drone remote with Smartphone attachedThe HS720 drone also has “follow me” and “point of interest” functions.

The “follow me” function basically follows the remote around. Seemed like it wanted to stay around 20 feet behind me, but may get confused after a couple of flights. I believe learning how to calibrate the drone is a must. I think that when it gets bumped around a bit, it needs to be recalibrated.

The “point of interest” is a little different. This function is also called “orbit”. Find a point of interest and place the drone 15 feet or so out from the point of interest, and the drone will orbit around this point. Now this is a customizable distance. So the camera then focuses on this point of interest and just keeps going around and around until you turn off the function. Then it just hovers where you turned off the function waiting for your command.

Arial View Drone CameraDefinitely need some space to fly a drone. Buildings and trees around is not a good mix, especially for new pilots. What happens is the drone gets turned around and then you get confused and start making it go this way and that way and bump into something. It will just crash at that point.

Either way, this is a good entry level drone. The kit that I got had 1 battery and some extra blades, and a nice case. There are some other kits that have 2 and 3 batteries. The battery is said to last 26 minutes. This is plenty of time, but if you have a task ahead, you may want to get extra batteries.

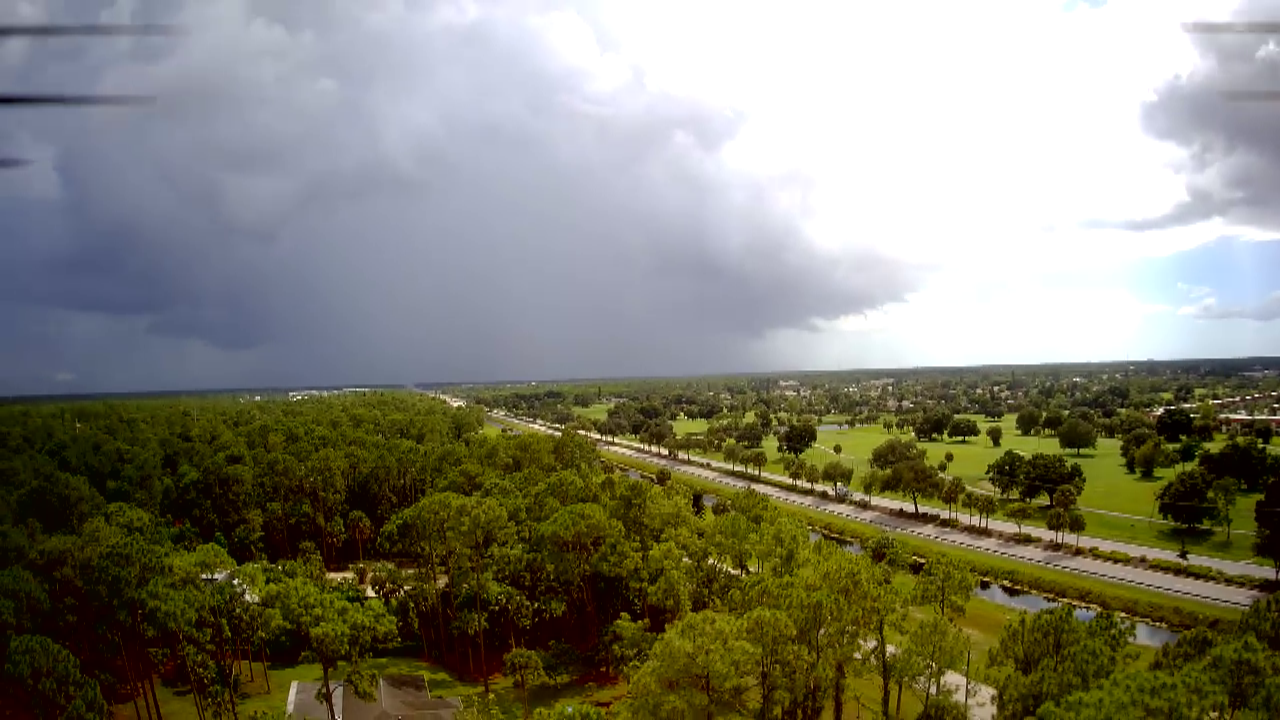
They are saying the camera is 4K and there is a setting for 4K (3840 x 2160). I was only able to get 1280 x 720 resolution. Still decent resolution. The instructions say the video is stored on the TF card and in order to view the phone has to be connected to the drone’s wifi. I haven’t tried, but maybe if I plug in my phone to the computer in order to download the video while the drone is turned on and my phone is connected to its WiFi it will be available. I’ll have to put that on my list.

GoPro 30 Pin Connector

GoPro 30-pin power cable I found a 30PIN POWER CABLE WITH WATERPROOF BACK DOOR HOUSING FOR GOPRO HERO3+&HERO4. The KAPAXEN product is no longer available with the waterproof back door. It is available without the backdoor and just the 30 pin Power Supply Connector.  The cord is the same and will power it the same.

I have a KAPAXEN 30 Pin Power Supply Connector with waterproof backdoor for my GoPro 3+ and GoPro 4 that I use all the time. I have the one that is through the back and waterproof. The  The USB connection is not completely waterproof, but can be protected to be outside. I have just not tried to put it under water. I have had it out in the rain with an extension cord cover and it worked great. I do time lapse photography with my GoPros and it will sometimes be plugged in for several days at a time and outside in the weather.


Same GoPro 30 Pin Connector without the back door. This will still come into play but may need to be modified to be waterproof. Click on either image to see it at Amazon.com

Top 20 Best Selling Power Banks on Amazon.com

This link is to a list of the best selling power banks on Amazon.com. Make sure and look at the mAh value as the higher the mAh the longer it will last.

You can use the 30PIN POWER CABLE WITH WATERPROOF BACK DOOR HOUSING FOR GOPRO HERO3+&HERO4 in conjunction with a power bank. Using a power bank will drastically increase the situations that you can extend your battery time. Getting the GoPro 30 pin connector with waterproof back door will extend your ability to leave the gopro oustide or even submerge the gopro under water.

Need a Lightweight and Mobile Tripod? Polaroid 42 inch Travel Tripod

Polaroid 42 inch Travel Tripod Half Extended

Polaroid 42 inch Travel Tripod Half Extended

This Polaroid 42″ Travel Tripod has become my new favorite. There is no hinge style adjusting on the tripod mount. Unscrew the handle and the whole thing gets loose, up, down, and side to side goes limp. Then put the camera where you want it and tighten it back up. The best part is that there is a solid piece connecting this neck to the tripod mount. This thing is as solid as a brick. No movement at all. The telescoping legs are more or less the same as the Sunpack and Vivitar travel tripod legs, but are a little different. They turn one way, and must have a slot that they fall into to lock the legs at the height you want. Click this link to go to Amazon.com and purchase one for yourself – Polaroid 42″ Travel Tripod Includes Deluxe Tripod Carrying Case For Digital Cameras & Camcorders

Sunpack 42 inch Travel Tripod Broken

Sunpack 42 inch Travel Tripod Broken

I have owned several Sunpack 4200XL travel tripods for a while now, and I recently bought a Polaroid Travel Tripod and a Vivitar Travel Tripod. I am on my third Sunpack travel tripod now. I primarily use this type of tripod to film with my Samsung HMX-F90. I originally found these Sunpack tripods at Best Buy, and the other two I got from Amazon.com.
The hinge that allows you to change your camera view from horizontal to vertical keeps breaking on the Sunpacks. The small tab that locks it into place while changing the position keeps snapping off over time. This allows the tripod mount to “jiggle” and makes for shaky videos. Other than that the legs lock in place and have been great. If you click on the image of the Sunpack travel tripod you will see the “missing” piece where the tripod mount hinges from horizontal to vertical.

The best Thing About the Polaroid 42 inch Travel Tripod

Polaroid 42 inch Travel Tripod - How I Use

Polaroid 42 inch Travel Tripod – How I Use

Polaroid 42 inch Travel Tripod Mount

Polaroid 42 inch Travel Tripod Mount

Polaroid 42 inch Travel Tripod Cam

Polaroid 42 inch Travel Tripod Cam

Polaroid 42 inch Travel Tripod Fully Extended

Polaroid 42 inch Travel Tripod Fully Extended

It is mobile. I can use the tripod itself to hold the camera level as I am walking or scanning. Also the tripod will fit in my bag or backpack, and it also fits in my vehicle. A regular sized tripod is cumbersome and gets in the way. I am always trying to be quick and a regular sized tripod always bumps stuff.

Travel Tripods – Sunpack Vivitar Polaroid – Review and Compare

42 inch Travel Tripods - They all look the same

42 inchTravel Tripods – They all look the same

I have owned several Sunpack 4200XL travel tripods for a while now, and I recently bought a Polaroid Travel Tripod and a Vivitar Travel Tripod. I am on my third Sunpack travel tripod now. I primarily use this type of tripod to film with my Samsung HMX-F90. I originally found these Sunpack tripods at Best Buy, and the other two I got from Amazon.com.

Sunpack 4200XL Travel Tripod

Sunpack 42 inch Travel Tripod Broken

Sunpack 42 inch Travel Tripod Broken

The hinge that allows you to change your camera view from horizontal to vertical keeps breaking on the Sunpacks. The small tab that locks it into place while changing the position keeps snapping off over time. This allows the tripod mount to “jiggle” and makes for shaky videos. Other than that the legs lock in place and have been great. If you click on the image of the Sunpack travel tripod you will see the “missing” piece where the tripod mount hinges from horizontal to vertical.

Vivitar 41 inch 8 Section Tripod

Vivitar 41 inch Travel Tripod Mount

Vivitar 41 inch Travel Tripod Mount

The vivitar is real similar to the Sunpack 4200XL. The hinge is the same, but seems like it is a little stronger. I mean that there is a bigger space between the two slots that hold the tripod mount in place. So it may not break off as easily as the Sunpack does. The telescoping legs are the same as the Sunpack and may even be made by the same company. You can see in the image that the Vivitar 41 inch travel tripod is made in a similar fashion as the Sunpack 42 inch travel tripod.

Polaroid 42 inch Travel Tripod PLTRI42

Polaroid 42 inch Travel Tripod Mount

Polaroid 42 inch Travel Tripod Mount

This Polaroid 42″ Travel Tripod has become my new favorite. There is no hinge style adjusting on the tripod mount. Unscrew the handle and the whole thing gets loose, up, down, and side to side goes limp. Then put the camera where you want it and tighten it back up. The best part is that there is a solid piece connecting this neck to the tripod mount. This thing is as solid as a brick. No movement at all. The telescoping legs are more or less the same as the Sunpack and Vivitar travel tripod legs, but are a little different. They turn one way, and must have a slot that they fall into to lock the legs at the height you want. Click this link to go to Amazon.com and purchase one for yourself – Polaroid 42″ Travel Tripod Includes Deluxe Tripod Carrying Case For Digital Cameras & Camcorders

Polaroid 42 inch Travel Tripod Cam

Polaroid 42 inch Travel Tripod Cam

Polaroid 42 inch Travel Tripod Fully Extended

Polaroid 42 inch Travel Tripod Fully Extended

You can see in the image that the hinge part is entirely different on the Polaroid 42 inch Travel Tripod than on the Sunpack or Vivitar travel tripods. I am so happy that I found this because it would always happen when I had an important item to video. Now I don’t have to worry about it breaking.

Polaroid 42 inch Travel Tripod Half Extended

Polaroid 42 inch Travel Tripod Half Extended

Polaroid 42 inch Travel Tripod Legs

Polaroid 42 inch Travel Tripod Legs

Polaroid 42 inch Travel Tripod - How I Use

Polaroid 42 inch Travel Tripod – How I Use


GoPro Hero 4 Time Lapse Video – Night Sky Moonrise

GoPro Hero 4 Night Lapse

GoPro Hero 4 Night Lapse

I was testing the Night Lapse function of my new GoPro Hero 4 and I was really impressed with my first time lapse of the night sky. The moon ended up rising out of the east halfway through the night. Many shooting stars were visible, as well as a few constellations. There was something that left a trail, either through the clouds or on its own. It may have been a jet, but it is undetermined. I can see some possibilities with this setting and will continue to experiment. The GoPro Hero 3+ only had a Time Lapse setting. I am still going to now test the GoPro Hero 3+ at night. With the Night Lapse setting, the shutter speed has many different settings. This video was with a 5 second shutter speed and shot at 30 second intervals.

I uploaded a video on Facebook and I didn’t think it did the night lapse justice. So I thought YouTube might be a bit better. You should be able to see the constellation Orion a few inches under the moon. Just above and to the right of the moon, Taurus. Then I think Venus is rising just as daylight approaches. There may be more constellations visible. Press the bottom right button to view fullscreen.


Top 20 Best Selling Power Banks on Amazon.com

This link is to a list of the best selling power banks on Amazon.com. Make sure and look at the mAh value as the higher the mAh the longer it will last.

You can use the 30PIN POWER CABLE WITH WATERPROOF BACK DOOR HOUSING FOR GOPRO HERO3+&HERO4 in conjunction with a power bank. Using a power bank will drastically increase the situations that you can extend your battery time. Getting the GoPro 30 pin connector with waterproof back door will extend your ability to leave the gopro oustide or even submerge the gopro under water.

GoPro Battery Life – Extended Forever and Waterproof

First thing, this is not a charger. I have tested this product to charge and it does so, minimally. It is for constant power. The usb connection on the side of the Go Pro unit is for charging.
GoPro 30-pin power cable The 30PIN POWER CABLE WITH WATERPROOF BACK DOOR HOUSING FOR GOPRO HERO3+&HERO4 will extend your gopro battery life forever, if needed, and is waterproof. I stumbled on this product a while back and have been using it successfully for a while now. This is a wired option, but is solid. There are a few pitfalls that I will warn you about, but otherwise I really like this product. This product is compatible with GoPro Hero 3+ and Hero 4. I have successfully completed several projects with it. The 30-pin power cable is great for extended time lapse projects.

I have another post where I went on about batteries and power packs, which only last 8-12 hours or so. Of course, you can continue to switch out the power packs, but waterproof is still an issue. Go Pro Battery – Battery Extender


Features of the 30-pin Power Cable for GoPro Hero

1 – It is waterproof. This is the best part. The one downside is the 6′ cable where there is a USB connection. This, of course, is NOT waterproof. So this means that the GoPro unit can be placed underwater for a few feet without problems. I would suspect that the cord can be cut and a new wire be soldered or connected somehow to be waterproof, but I am not going this direction yet. This setup works fine, and I can deal with rain. I place a plant pot on the ground, then place my connection on top of it, then place a 5-gallon bucket over this. Then the connection is not on the ground and is covered. I have also found a connection cover, that is not waterproof, but will withstand the rain and being wet. It just won’t go underwater.

2- Unlimited run time. Once plugged in, it is ongoing. I have successfully done a 3-1/2 day time lapse so far, but that is the longest that I have done it. I would think that in a reasonable scenario, barring any extreme weather, that it would last as long as it had power and memory.

3 – The GoPro back door will work with my existing accessories.

4 – I have the option of 12v power, 110v power, power banks, and even plugged in to a PC. Of course, some options are as limited as they have capacity.

Pitfalls of the 30-pin Power Cable for GoPro Hero

1 – When you close the back door, the cable has a small box, which has to fit inside of the waterproof back door. This will make the cable inside the waterproof back door have to curve around to fit. There are two structural bands of plastic that run from the back of the waterproof back door towards the gopro unit itself. Make sure the cable is not in front of this. It will want to push it out into the seal, and may create a situation where the waterproof back door is not waterproof. If you are going to completely submerge the unit in water then this will come into play. If it is just getting rained on, then it may not be a problem. I found out about this the hard way.

2 – Plugging and unplugging, and withholding power may confuse it and will turn off in the middle of your project. I have had this happen. Once the 30-pin cable is plugged in, it changes the behavior of the unit. It is not like the USB plug where you can just plug and unplug and it will use the battery once it is without external power. Test, test, test.

3 – I have also had better luck with a power cord out to the project, then an adapter to plug in the USB of the 30-pin Power Cable directly to power. I am not sure why, but it seems to get to the finish line, without fail, more consistently.


Here is a link to the exact same 30-pin Power Cable without the waterproof backdoor:

Top 20 Best Selling Power Banks on Amazon.com

This link is to a list of the best selling power banks on Amazon.com. Make sure and look at the mAh value as the higher the mAh the longer it will last.

You can use the 30PIN POWER CABLE WITH WATERPROOF BACK DOOR HOUSING FOR GOPRO HERO3+&HERO4 in conjunction with a power bank. Using a power bank will drastically increase the situations that you can extend your battery time. Getting the GoPro 30 pin connector with waterproof back door will extend your ability to leave the gopro oustide or even submerge the gopro under water.

Go Pro Time Lapse – How to Process in Windows Movie Maker

1 - 4 : Add your Go Pro Time Lapse files to Windows Movie Maker.

1 – 4 : Add your Go Pro Time Lapse files to Windows Movie Maker.

1 – Once you have Windows Movie Maker open, find where all your Go Pro images are that you are wanting to process into a time lapse movie.

2 – Get your photos or images into the Movie Maker editor. Click ADD PHOTOS, or click in the square to the right of the preview where it says “Click here to browse for videos and photos”, or simply drag and drop your images into the movie maker editor. I always choose all that I want to do at one time, click the first one, then Hold <shift> and click the last one, then by clicking on the first one again to drag into the editor. I always try to click on the first one when dragging to make sure and keep them in order. I have had them get out of order before, and I believe that was the cause. The other two methods I do think this same practice applies.

———This would be a good time to make sure your Time Lapse images are in order. Just hover over the Time Lapse images and see what the file names are. If they are from your Go Pro, the Time Lapse images should be in consecutive order with their respective file names. If they are not, you can “cut and paste” just don’t do it quick.

Let the Time Lapse images load before you go any further.

Once the images are added – Let them load before moving any further.

3 – I only take 200 images at a time and make a movie with them. At 720 medium, the images are 4MB each and that is 800MB of data.

4 – If there are labels on your images, refer to this post to remove. There are two methods.

Change the duration of each image.

Change the duration of each image. This will create a FPS.

5 – Once the photos are in Windows Movie Maker, don’t click on anything, as all the images are selected currently. Also, wait for the images at the top to load. There are usually a few images that are blank, once all the images load, then these will show their thumbnails. Now choose the EDIT tab, (the edit tab will show up after you have photos or videos in the editor), change the duration of each image to your preference. This may depend on your time lapse project, I use .07 often, but have sped up or slowed down depending on what I am making a Time Lapse Movie of. Start with .07 and then you can play with it once you go through this walk-through. Then I usually scroll through the images to make sure that they are all loaded and processed before moving on.

6 – If you did click and now only have one image selected, simply go up to the first image and select it, then scroll down to the last image and hold down the shift key while selecting it. Now you should have all the images selected.

Save the Time Lapse Movie

Save the Time Lapse Movie – Short Time Lapse Movie

7 – Now save the movie in a folder of your choosing. Top left drop down arrow, select Save Movie —-> then (I usually choose) Recommended for this project (you can try some different settings, and I believe there are some custom settings somewhere. Now your browse window should pop up, navigate to the folder and name the file. In this scenario, I make sure that I am in the correct folder then I name the files with numbers, 1,2,3. This will come in handy in a few steps. Also choose MP4 or Windows Media File. I use Windows Media File, but you may want the MP4 setting. Movie Maker will read either.

Save it again if you get an error message

If you get an error message like this one or one that says there is not enough memory – try saving it again

——If you get an error message – try to just save it again the same way. I don’t know why, but this is what it does. I stumbled across this one day, after I had tried everything. Then I scaled down to 200 images and it seemed to cooperate after that.

Start a New Windows Movie Maker Project

Start a new Windows Movie Maker project.

8 – Now that this phase is complete, it is time to move on to the next set of 200 images. Again, upper left drop down, choose New Project. It will ask if you want to save, I usually don’t when I am in between like this, but you can if you want.

Put all the Time Lapse shorts into one project

Put all the Time Lapse shorts together into one WIndows Movie Maker project

9 – Repeat the process 1-8 until you have all of your Go Pro Time Lapse images processed. Continue saving your Time Lapse movies in consecutive numbers so you can retrieve later.

Make a Go Pro Time Lapse movie

Add title, music, captions, credits, etc.

10 – Now, choose New Project again to clear the editing board. Now Add Files or refer to step 2 and pull in your newly created mini-movie Time Lapse movies. Hover your mouse over them and make sure they are in order.

11 – Add a title, add captions, add music, add credits, etc. then go through step 8 again, except this time, name the Go Pro Time Lapse movie something that represents the video instead of a number. This is the file you would upload to YouTube or Facebook.

Your Go Pro Time Lapse Movie is finished - Save it.

Your Go Pro Time Lapse movie is finished. Save it.

Good Luck and comment with any suggestions or experiences you have had with processing Go Pro Time Lapse images in Windows Movie Maker.


This post was more about the sensitivity of Windows Movie Maker with the large amount of files, than a how to create a time lapse. Pay special attention to the details as I have figured out how to get past some of the more challenging ones.

A power bank may be useful in creating time lapse videos with your GoPro

Top 20 Best Selling Power Banks on Amazon.com

This link is to a list of the best selling power banks on Amazon.com. Make sure and look at the mAh value as the higher the mAh the longer it will last.

You can use the 30PIN POWER CABLE WITH WATERPROOF BACK DOOR HOUSING FOR GOPRO HERO3+&HERO4 in conjunction with a power bank. Using a power bank will drastically increase the situations that you can extend your battery time. Getting the GoPro 30 pin connector with waterproof back door will extend your ability to leave the gopro oustide or even submerge the gopro under water.

GoPro Battery – Battery Extender

GoPro on a Power Bank

GoPro on a Power Bank

To get more out of your GoPro battery you can use a power bank. A power bank is typically used to charge your cell phone in a mobile setting, without the need to find an outlet. A power bank can be used to charge your GoPro camera as a stand alone charger. The power bank can also be used to power the GoPro unit and extend the single use life of the battery by 4 or more times.

GoPro Skeleton Housing

GoPro Skeleton Housing

Using the skeleton housing, you can use a myriad of the GoPro accessories available. The skeleton housing allows the charging cable to be plugged in to the side and still be in a housing. The skeleton housing is not waterproof. It is the one downside. It sure beats drilling a hole in the standard housing.

The Power Bank that I am using is the Targus 5500 mah. This unit will charge the GoPro battery in 1 1/2 hours versus 2 hours for the PC. A normal battery will last around 2 hours and 20 minutes shooting a 30 second interval time lapse. Using a fully charged GoPro battery and plugging in the power bank the same time lapse will go for just under 12 hours. This is great, because time lapse projects usually take more than 2 hours. This means that I can set up a time lapse project and not have to rely on 110v power. There may even be bigger power banks out there.

These and other GoPro Products recommended by Project Bolony

Top 20 Best Selling Power Banks on Amazon.com

This link is to a list of the best selling power banks on Amazon.com. Make sure and look at the mAh value as the higher the mAh the longer it will last.

You can use the 30PIN POWER CABLE WITH WATERPROOF BACK DOOR HOUSING FOR GOPRO HERO3+&HERO4 in conjunction with a power bank. Using a power bank will drastically increase the situations that you can extend your battery time. Getting the GoPro 30 pin connector with waterproof back door will extend your ability to leave the gopro oustide or even submerge the gopro under water.

GoPro Battery Life – More Charging Options

The GoPro battery life can be extended with some of these methods. Charging the GoPro camera is sometimes a challenge, especially when you are wanting to be using it while the battery is charging.

DigiPower GoPro Charger

DigiPower GoPro Charger

DigiPower GoPro Charger

GoPro Batteries Notched

GoPro Batteries Notched

So now with the DigiPower charger you can be charging a GoPro battery and using the GoPro unit at the same time separately. The charger package I got also came with a battery, so I was able to alternate. The only problem was that the DigiPower battery had 2 notches in the top that snapped into the charger and the GoPro brand batteries do not have notches. I was able to take a razor blade and cut just enough of the plastic out on the GoPro brand batteries and they work and charge fine. So after a little time keeping, this charger takes 4 hours and 20 minutes to fully charge the GoPro brand battery.

Charging GoPro with PC

It only takes 2 hours and 3-5 minutes to charge the GoPro battery using the GoPro unit plugged in to a PC USB port. The one thing with charging this way is that the GoPro camera cannot be used while charging. I wanted to keep like items so I did not test the DigiPower brand battery, but I will update soon with this info.

110v Charger and 12v Charger

Using these charging methods are good, takes about 2 hours and 20 minutes. This is just a little longer than if it is connected to a PC. These charging methods can also be used to power the GoPro camera unit.

Power Bank – Cell Phone Charger

Power Bank GoPro Charging

Power Bank GoPro Charging

What is better than that? Using a power bank, specifically the Targus 5200 mah. This will charge the batteries while in the unit, as well as power the GoPro camera if you turn it on while charging. It only takes 1 hour and 33 minutes to charge the GoPro camera with the power bank. Fully charged the power bank will charge the GoPro battery 3 full times. I have used this method to prolong some of my time lapse projects. It turns a 2 1/2 hour battery into an 11 hour battery. The only thing that I lose is the ability to go underwater. I don’t do any underwater time lapse, so I’m good.

If you are using the power bank option, you can keep going by just switching out the power banks and the GoPro camera will not turn off during the process, unless you drain the power bank and battery completely. This can drastically increase the GoPro battery life and mobility.

Takes about 8 1/2 hours to fully charge the power bank.

GoPro Accessory – Skeleton Housing

The skeleton housing can be used in all these scenarios. Using an extension cord or even a USB extension can widen the range significantly.

GoPro Skeleton Housing

GoPro Skeleton Housing

Top 20 Best Selling Power Banks on Amazon.com

This link is to a list of the best selling power banks on Amazon.com. Make sure and look at the mAh value as the higher the mAh the longer it will last.

You can use the 30PIN POWER CABLE WITH WATERPROOF BACK DOOR HOUSING FOR GOPRO HERO3+&HERO4 in conjunction with a power bank. Using a power bank will drastically increase the situations that you can extend your battery time. Getting the GoPro 30 pin connector with waterproof back door will extend your ability to leave the gopro oustide or even submerge the gopro under water.

GoPro Battery Life

Charging the GoPro Hero 3+

The GoPro Hero 3+ with the charging light on.

The rechargeable battery that comes with the GoPro Hero 3+ will last a while, but has to be monitored to make sure that the camera is still on when the action comes. During some recent testing I found that the standard battery lasts for 2 hours and 10 minutes shooting video and 2 hours and 25 minutes shooting a time lapse on 30 second intervals. So that means that the GoPro batteries have to be changed out (assuming you have more than one) if your action is lasting more than the 2:10 time span.

I found that the batteries cost around $20 purchased separate from the GoPro unit. This is the GoPro brand battery too. You can also buy an off-brand charger so you did not have to use the GoPro unit as the charger. You can only use the GoPro camera while charging if it is plugged in to a non PC USB outlet. I posted info on this method here:  http://www.tagnaples.com/gopro-battery-alternative-power/.

Does the LCD Touch BacPac use more battery life?

GoPro LCD Touch BacPac

GoPro LCD Touch BacPac

YES! Using the LCD Touch BacPac definitely decreases the time the battery will last. A normal battery without using the LCD Touch BacPac shooting video lasts around 2 hours and 10 minutes. Attaching the LCD Touch BacPac decreases the time by 40 or more minutes. So the video will only shoot for 1 hour and 30 minutes, give or take a few minutes. The same goes for time lapse, but the time lapse shoot lasts a little longer than the video. So from now on, unless I need to see what I am shooting, I will not be using the LCD Touch BacPac. The LCD Touch BacPac sure is nice though, being able to see exactly where the frame is.

Does using the WiFi Remote Control use more battery life?

GoPro WiFi Remote

GoPro WiFi Remote

The answer is yes, but it is not enough to worry about. I did some extensive testing while shooting video. The WiFi remote only takes a few minutes off of the GoPro battery life.

What will kill the battery after you turn the GoPro off, is when you don’t turn off the wifi setting on the GoPro camera. Sometimes just turning off the WiFi Remote will do it, but if there is still a blue light blinking, that means that it is still searching for a wifi signal. I guess you can power on the unit with the remote and that is why it continues. If you throw the GoPro camera in your bag, the GoPro battery will surely be dead when you get ready to use it if the wifi setting is still on.

Top 20 Best Selling Power Banks on Amazon.com

This link is to a list of the best selling power banks on Amazon.com. Make sure and look at the mAh value as the higher the mAh the longer it will last.

You can use the 30PIN POWER CABLE WITH WATERPROOF BACK DOOR HOUSING FOR GOPRO HERO3+&HERO4 in conjunction with a power bank. Using a power bank will drastically increase the situations that you can extend your battery time. Getting the GoPro 30 pin connector with waterproof back door will extend your ability to leave the gopro oustide or even submerge the gopro under water.