Poultry Prison: Chicken Fence Height – How to keep your chickens’ whereabouts under control

How to keep your chickens from pooping on the driveway.
How to keep your chickens from digging holes all over the yard.

How to keep your chickens from digging holes in your neighbors yard.

How to keep your chickens out of the garden.

Using Chicken Fence Height to keep your chickens under control.

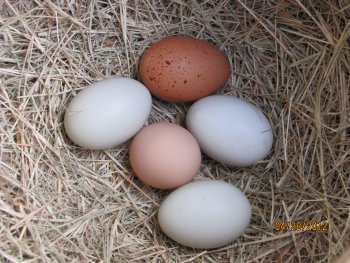
We have had chickens for almost two years now. The chickens we own now, we raised from chicks we purchased from the feed store. We really like having plenty of eggs, and being able to give eggs away by the dozens to people we know. Our eggs are all different colors, but are all the same once they are cracked open. Right now we have 13 hens. 2 of the hens are bantam hens. The other hens are full size.

Eggs of all different colorsHello! I could use a little privacy! Who turned on the lights?

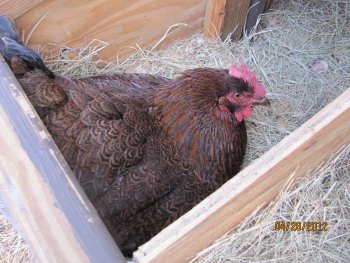
We have one Bantam Rooster. This guy is mean. He does not like when you get the eggs out of the cage, or change the water, or anything, for that matter.

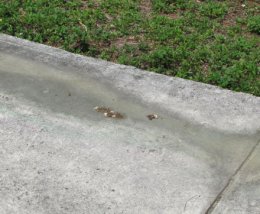
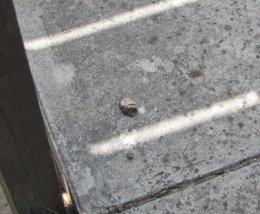
Today we set out to stop the chickens from littering the back of our house with Land Mines. For those of you who don’t know what a land mine is, check out these photos.

Chicken Land Mine - It is not pretty.Chicken Land Mine - Another one and we can't keep this up.

This is the 3 foot fence. Did not even slow them down.

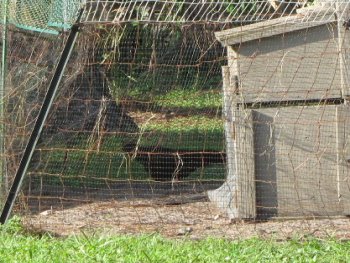
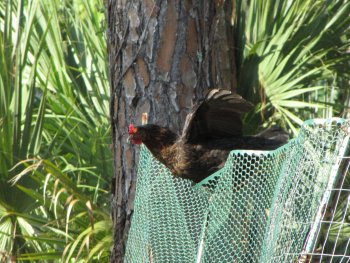
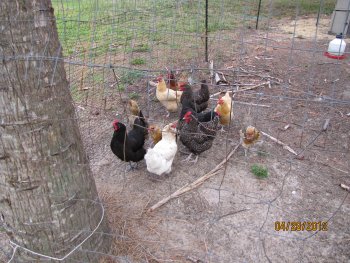
We put up a fence around the coop in order to discourage them from going everywhere. I mean, they were going into the street, the neighbors yards, even up into our stairs and porch areas. We were waiting for them to come in the house, if we left the door open on a cool day. The fenced in area was put in so they would have plenty of room to roam. That did not last long and they were crawling under, flying over, and even going through in some cases. So I mended the fence everywhere I could, and put up more barriers, with no success.


Short fence is on the right adn the taller fence you can see is enclosed to the coop run.
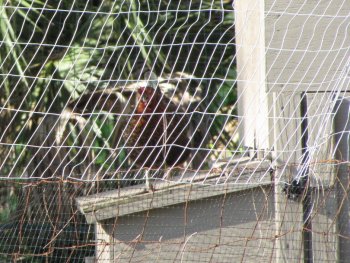
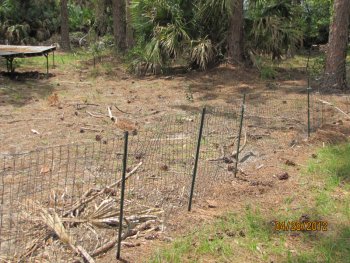
After much time, I was able to get some pre-owned 4 foot sturdy fence, and I found some beefy 6 foot temporary fence posts at the hardware store. So using the trees and these new found fence posts, I put the 4 foot fence up. The photos you see are our first go at it. If this works, I will expand it to encompass more space for them to roam. I extended the 6′ fence posts with the other (salvaged) fence posts so about 7′ or 8′ is actually out of the ground. Some places I used some 3′ rabbit fence on top of the 4′ fence, and other places I used the plastic chicken wire on top. The rabbit fence holds up better, but it does not matter as long as they don’t fly over it. We were not as concerned with all the pot holes they leave in our yard (everywhere), as we were with the land mines on the concrete walks.

Overview of the coop, run, and yard. Extended to keep all flying acrobats inside. aka Chicken Prison Naples, FL

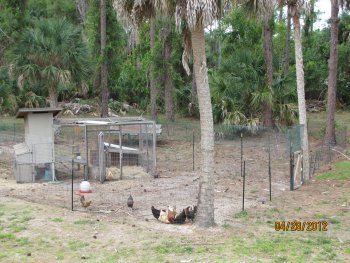
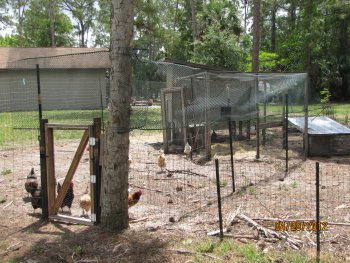
This photo is an overview of the entire prison. We only call it that, because we used to let them roam free. We would let them, but we live in an area that is only half rural. We do have neighbors, and they are all city folk. We can’t have our chickens leaving gifts for the neighbors.


All But One.
They always seem to be hungry!

Escape from Poultry Prison – More Extreme Chicken Fence

Black Star Chicken scoping out landing on nesting box


This Black Star chicken was getting out almost every day, sometimes several times after putting her back in. We were seeing her out, then we could not find her, because she was back in. Then we finally saw her go right through the fence going back in the fenced yard. She went between the screen we put over the bigger 5″ fence and the upper rabbit fencing. This one chicken has dug lots of holes in the yard. These holes can really take you for a ride when mowing, and then will trip you when you walk. NO GOOD.

Black Star Chicken on Nesting Box

Now the chicken is on the nesting box looking for the next landing site.


Black Star Chicken landing on tall fence


After the nesting box she lands on the tall fence before leaping to the ground.


 This video shows the black star nonchalantly moving the direction of escape. Each step she is making it look like she is supposed to be there.

Chicken Fence – installing chicken fence

Chicken Fence Height – Installing more chicken fence

Chicken Fence – Chicken Coop Fence Escapee

Panther Traffic Signs – Naples, FL

Panther Traffic signs - Naples, FL


The panther traffic signs may look good to the tourists, but I would hate to think that we would expect panthers in this area. There are 5 or 6 subdivisions and an apartment complex just beyond this sign. The zoning probably does not allow for panthers. Also the next photo shows the surrounding area.


Panther Traffic Signs and  Sidewalk

The panthers don’t stand a chance on this highway. Just because there are panther traffic signs doesn’t mean people really think there may be a panther in the road. Recently expanded to 6 lanes, they would be hard pressed to actually cross. This sign is just past the Wal-Mart on Collier Blvd. 1 mile south of Davis Blvd. in Naples, FL.

Change the Directory Folder Name for the DotNetNuke Install in Godaddy – 2

This is the second part of the instructions on How to change the name of the root directory folder in Godaddy for a DotNetNuke installation.

How to Change the name of the root directory for a DotNetNuke Install in Godaddy – 1

OK so now we are fully backed up with the DotNetNuke install folder and a fresh copy of the database. Now we are ready to take the next steps. It is my opinion that the install folder and the database work independently of each other, and the folder name is not as important as thought. The web.config file has not been changed, only copied. So any of the keys, or database names all remain the same.

The only things that have been changed so far are:

  1. New portal alias created in the DotNetNuke portal.
  2. a fresh backup of the install folder in the FTP File Manager,
  3. a fresh backup of the database in the _db_backups folder,
  4. new folder in the IIS Management or Godaddy Virtual Directory.
  5. and a new folder in FTP File Manager with the exact same name as the new one created in IIS, with fresh copies of all files in the original DotNetNuke installation.

Items 2 and 3 above can all be brought back and everything the way it was if something messes up.

Again, these instructions are geared towards those who have a Deluxe Hosting Account in Godaddy.

NEXT is pointing to the new folder. If you are keeping your primary domain the same and in the root directory, then follow the instructions at this link:

Change the root directory folder name in Godaddy Economy Hosting – 1

If you have another domain after the primary, then read on.

  1. Log into Godaddy and go to “My Account”/ “Web Hosting”/ “Launch”
  2. Hover over “Settings” and Choose “Hosted Domains”
  3. Check the box on the left and choose the pencil or “Edit”
  4. Now browse to the new folder and press “OK”
  5. After a few minutes the Status will say “Setup”, then you can navigate to the new folder in your web browser. It should now come up with the same DotNetNuke installation as before, except now with the new directory name.

There may be a few things you need to know.

  1. You may have to wait up to 24 hours before the new virtual directory will take effect. It may not come up immediately like the domain manager will point to it. It will point to it within minutes. It takes time for the virtual directory to resolve itself. This is the one element that I was missing and I was very upset, but the next morning it worked fine. Imagine that.
  2. The paths of the images and links will point towards the other old website folder. Go through and change them, before you start adding more. All the images should be in your new directory folder, but the old folder name will be in the path of the html code. All this is stored in the database, so if you switch back, you will have to change them back. This may support a case of keeping the images in a separate folder than the portal. I don’t know if that is possible real fast.

For Godaddy Economy Hosting or to keep your primary domain in the root directory refer to these links:

Change the root directory folder name in Godaddy Economy Hosting – 1

Change the root directory folder name in Godaddy Economy Hosting – 2

How to change the DotNetNuke Install directory folder name for a Godaddy Economy Hosting website.

How to change the DotNetNuke install directory folder name in a Godaddy Economy Hosting setup. This will also work for the Deluxe setup, if you have not set up a -false domain name as your primary domain.

This is going to be two parts. Let’s get started.

Before you go into Godaddy, log into your DotNetNuke website as the SuperUser and create new portal aliases. The path is “Host”/ “Portals”/ “Edit” (appropriate portal)/ “Advanced Settings”/ “Portal Aliases”/ “Add new Alias”. Another path is “Admin”/ “Site Settings”/ “Advanced Settings”/ “Portal Aliases”/ “Add new Alias”. Your new alias should include the new desired directory folder name (www.yourdomain.com/yournewdirectoryname). The old one should be there so you can model after it. I believe all this is stored in the database, so it may not matter to do it first, as long as you get it in there sometime before you expect to navigate to it. You can also just add it straight to the database as well, I am sure.

  1. Log in to your Godaddy account and then choose “My Account”.
  2. Scroll down to Web Hosting and click on the “+” symbol then choose “Launch”.
  3. a new window should pop-up to show all the options in the hosting account. They have a new hosting menu page look, but the tabs at the top of the page are still the same “as of now”. So we will go from there.
  4. Try to follow the steps below in between doing anything, as the website will eventually be “inactive” for a while.
  5. The first step is to back up everything. The best thing to do is have a fresh backup of the DotNetNuke install folder and the database file. Start with the install folder. At the top hover over the “Tools” tab and choose “FTP File Manager”.
  6. I have found that copying an entire DotNetNuke/DNN installation folder does not ever finish. So I make a new folder, then copy 3 folders at a time into the new folder, then all the “spare” files that are left. My install has 49 directories and files. So the new folder should have the same. Now we have a fresh copy of the DotNetNuke/DNN install folder.
  7. Next is to backup the database – hover over the top tab named “Databases” and choose correctly. If you don’t see your database choose a different option. There should be a database listing with status as “Setup”.
  8. On the right hand side under “Action” choose the pencil or “edit”. There should now be an information page with all the information on the database file. Up at the top find the button “Backup” and click it.
  9. Press “OK” – you will have an opportunity to rename later.
  10. I always have to use internet explorer ftp in order to find the “_db_backups” file. This is where Godaddy sends the database backup files.  Then you can change the name of the database.
  11. Now hover over the “Tools” tab again and choose “IIS Management”.
  12. You should be seeing your original DotNetNuke install folder with a green dot on it. This is a virtual directory set as an application root. This is what is needed in Godaddy to install an application.
  13. Make sure only the Content Root is checked and click “Create” at the top. Now you need to name your new directory here. Then check the box at “Set Application Root”, and “OK”.
  14. Now make sure that your new directory is the only box that is checked and start creating any folders that are in your original install directory. Mine has app_code, app_data, bin, config, desktopmodules, images, install, portals, portals/_default, and web.config. (I duplicated the web.config on mine, but it still remains in “Pending Setup” status to this day, so maybe it is not needed.) It may take up to 24 hours for the virtual directory to resolve, so keep this in mind.
  15. After a few minutes go back to the FTP File Manager and see if the new folder you created in the IIS Manager is there. When it is there, go ahead and copy the current DotNetNuke install files into it. Change the permissions to Web Writable for the new folder in the FTP.

OK so now we are fully backed up with the DotNetNuke install folder and a fresh copy of the database. Now we are ready to take the next steps. It is my opinion that the install folder and the database work independently of each other, and the folder name is not as important as thought. The web.config file has not been changed, only copied. So any of the keys, or database names all remain the same. The only things that have been changed so far are:

  1. New portal alias created in the DotNetNuke portal.
  2. a fresh backup of the install folder in the FTP File Manager, (separate and untouched)
  3. a fresh backup of the database in the _db_backups folder,
  4. a new folder in the IIS Management or Godaddy Virtual Directory of your desired new folder name,
  5. and a new folder in FTP File Manager with the exact same name as the new one created in IIS, with fresh copies of all files in the original DotNetNuke installation.

Items 2 and 3 above can all be brought back and everything the way it was if something messes up. With this method everything can be turned back.


How to change the DotNetNuke Install Directory Folder name for a Godaddy Economy Hosting website – 2

Part 2 How to Change the DotNetNuke Install directory folder name for a Godaddy Economy Hosting Website. OK so now we are fully backed up with the DotNetNuke install folder and a fresh copy of the database. Now we are ready to take the next steps. It is my opinion that the install folder and the database work independently of each other, and the folder name is not as important as thought. The web.config file has not been changed, only copied. So any of the keys, or database names all remain the same. The only things that have been changed so far are:

  1. New portal alias created in the DotNetNuke portal.
  2. a fresh backup of the install folder in the FTP File Manager, (separate and untouched)
  3. a fresh backup of the database in the _db_backups folder,
  4. a new folder in the IIS Management or Godaddy Virtual Directory of your desired new folder name,
  5. and a new folder in FTP File Manager with the exact same name as the new one created in IIS, with fresh copies of all files in the original DotNetNuke installation.

Items 2 and 3 above can all be brought back and everything the way it was if something messes up. With this method everything can be turned back.

Now it is time to change some things around.

  1. Log into the Godaddy FTP File Manager.
  2. In the root directory find the welcome.html file.
  3. Click the box next to it and press “edit” at the top.
  4. if it comes up in its structured format, press the “Html” button to see the code.
  5. towards the top find the line that reads-  < script > { window . location = ‘http://www.yourdomainname.com/dotnetnuke’ } < / script >
    (minus all the spaces) where it says /dotnetnuke is where your current undesirable directory name is. The best thing to do is put a “< ! – -” before the opening and a “- – >” (again, minus the spaces and the quotation marks) after the closing script tags, this way you always have the original, just in case a character gets misplaced.
  6. Now that you have the script command line isolated, copy and paste it right underneath of the original. Make sure this one does not have the “html disregard” tags around it.
  7. Change the new line directory name to your new directory name that you set up in the first part, at IIS and FTP.
  8. Save or press OK and save in the next frame. Close the frame and it should load.
  9. You should now be able to type in the domain name in your browser and it will load the new folder name.

There may be a few things you need to know.

  1. You may have to wait up to 24 hours before the new virtual directory will take effect. It may not come up immediately like the domain manager will point to it. It will point to it within minutes. It takes time for the virtual directory to resolve itself. This is the one element that I was missing and I was very upset, but the next morning it worked fine. Imagine that.
  2. The paths of the images and links will point towards the other old website folder. Go through and change them, before you start adding more. All the images should be in your new directory folder, but the old folder name will be in the path of the html code. All this is stored in the database, so if you switch back, you will have to change them back. This may support a case of keeping the images in a separate folder than the portal. I don’t know if that is possible real fast.


VIDEO – Pileated Woodpecker breakfast in Southwest Florida – Giant Woodpecker

This is a short video of a Pileated Woodpecker pecking on a pine tree. The pecking sound is very loud due to his giant size. They are sighted often here in SW Florida and are seen many times in pairs. The Pileated Woodpecker sound is very distinct and can be heard from a great distance. These woodpeckers are very large, and will shower tree bark as they are hunting for food.