
Wow! I stumbled on the GoPro Studio recently and it is definitely better for processing the Time Lapse images from my GoPro camera than Windows Movie Maker is. Even though it still wants to crash, at least it doesn’t crash until after I have created and exported the finished video. Movie Maker won’t even let me get through a session of creating shorts to eventually put together. More on that later, right now I am going to “Walk Through” creating a finished Time Lapse video in GoPro Studio.
 This is free software provided by GoPro. So after you have downloaded it here – DOWNLOAD GOPRO STUDIO PAGE – and opened it up, this is where we will start.
To summarize what we are doing, we are going to import the images that the GoPro created into the GoPro Studio. Then convert these imports into mini-videos. Then these mini-videos will be put together, along with title, and possibly effects, to create one video of the entire time lapse project.
Converting The Time Lapse images into Mini-videos
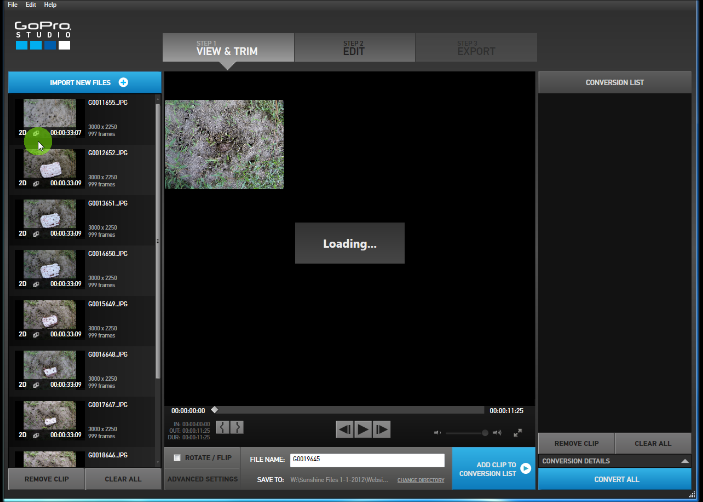
1 – At the bottom, towards the center, there is a SAVE TO: and path. This is where the conversions are going. Put them where you want them, or notate where the default path is.
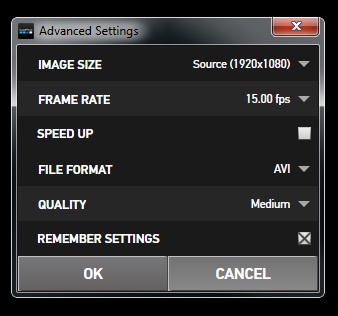
2 – Advanced Settings
2 – Now just to the left of this is ADVANCED SETTINGS – click this window. This is going to determine the conversion, so check the list and make sure this is what you want. The frame rate is where you are going to set how “fast” the time lapse is going to go. I set mine for .07 seconds per frame, which equates to about 15 frames per second. Then I save as AVI (as I am PC) and I check REMEMBER SETTINGS. If you are going to do different things to different sets of images, then leave the REMEMBER SETTINGS box unchecked and then add to conversion list one at a time.
3 – Now would be a good time to go ahead and save your project. This will insure that you can continue where you leave off.
4 – Import all the images into the GoPro Studio for converting into video files. Each “set” of images will be converted to a separate file. If you have created more than 1,000 images on your GoPro, then they will be in individual folders. Start with the first folder and select all (or choose the first one, then while pressing the SHIFT key, choose the last one). You can select the files by pressing the “IMPORT NEW FILES +” button on the left side, or by dragging them into the left column under that same button.
5 – Continue adding files to the left column until you have them all stacked up in there. If you want, just go ahead and press “ADD SELECTED TO CONVERSION LIST” one at a time as you import.
6 – If you want each file to have custom settings: Click your image set, change advanced settings, add a custom file name if desired, then click the ADD SELECTED TO CONVERSION LIST, each time.
6 – Otherwise select the first set, then scroll down and while holding the SHIFT key, select the last set. Now press the “ADD THE SELECTED TO CONVERSION LIST”.
7 – OK, at this point nothing has happened. You can remove clips from the conversion list, or start over. You can select each set and then click “CONVERSION DETAILS” to make sure that each one is the way you want it.
8 – Press the button labeled “CONVERT ALL” at the bottom right side, now take a break, if there are a few sets of images this may take a while. I did 9,000 images in 10 sets and it took around 2 hours to convert to AVI.
Now to Create a Go Pro Time Lapse Video
1 – Once all the conversions are complete the button on the bottom right will now say “PROCEED TO STEP 2”. Click it.
2 – Blank Template
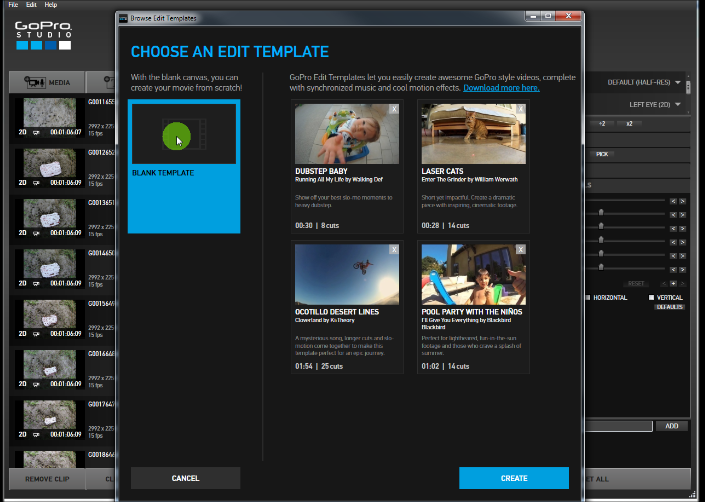
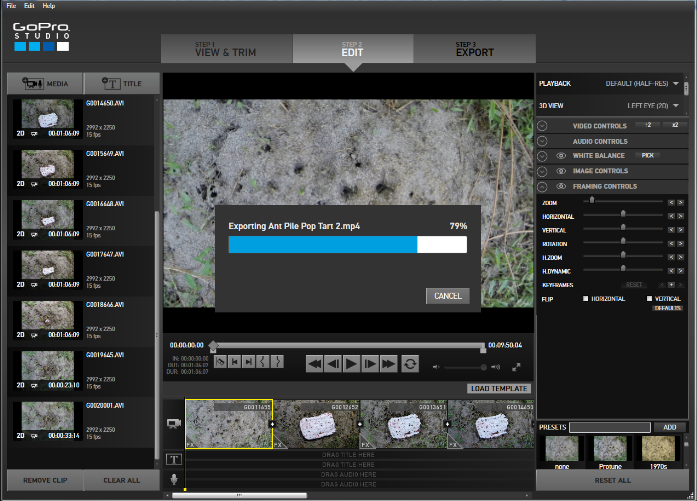
2 – A pop-up window will appear with selections of templates. Start with a blank template. This will allow you to customize to your liking and the other templates can be accessed later when there is nothing loaded up. Now the editing window should be up.
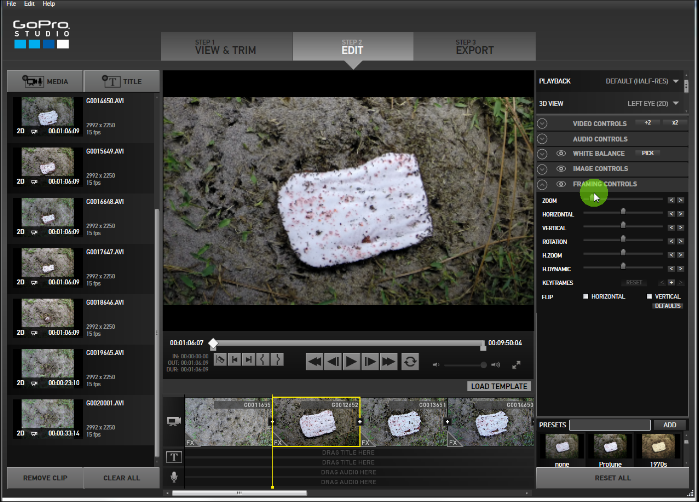
3 – So all of the mini-video files should be loaded up on the left. Choose one at a time, or all (by clicking on the first one, hold SHIFT, and click the last one. Now drag and drop them to the timeline at the bottom center of the screen. Next to the video camera icon it says DRAG VIDEO HERE.
 4 – A title screen can be made by pressing on the TITLE button at the top on the left. On the right hand side towards the top is the TITLE PROPERTIES. Customize the title.
5 – now back on the left there is a Title along with the other videos that are now in the timeline. If you want this in the beginning as an opening drag the title to the beginning of the timeline and wait until the line (cursor) is in front of the first frame. If you want the title over your video then drag it to a place under the time line where it says DRAG TITLE HERE. You will have to move it to where you want it then adjust the length of time.
6 – Now you are ready to EXPORT – at the very top next to STEP 2 EDIT is STEP 3 EXPORT – Click it.
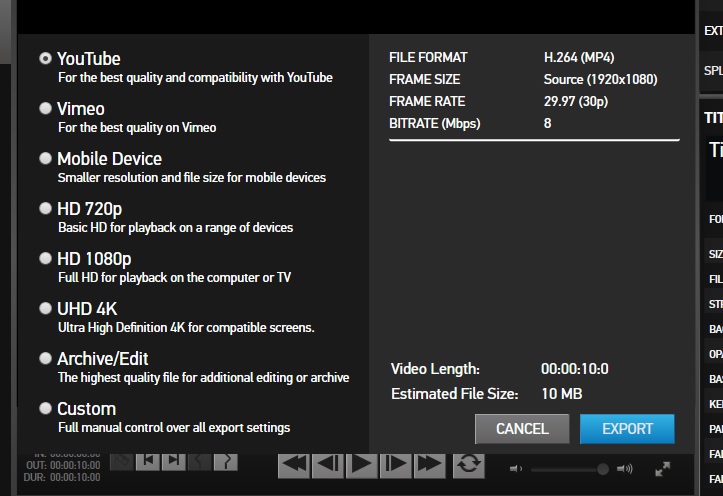 7 – I usually will leave it on the first setting YOUTUBE, but you can choose whatever you want. It will tell you the size of the frame and also how much memory it takes.
8 – Then click EXPORT and it will bring up a window for you to name the file and choose the directory.
Here we go!
A power bank may be useful in creating time lapse videos with your GoPro
Top 20 Best Selling Power Banks on Amazon.com
This link is to a list of the best selling power banks on Amazon.com. Make sure and look at the mAh value as the higher the mAh the longer it will last.
You can use the 30PIN POWER CABLE WITH WATERPROOF BACK DOOR HOUSING FOR GOPRO HERO3+&HERO4 in conjunction with a power bank. Using a power bank will drastically increase the situations that you can extend your battery time. Getting the GoPro 30 pin connector with waterproof back door will extend your ability to leave the gopro oustide or even submerge the gopro under water.